Mac Catalyst
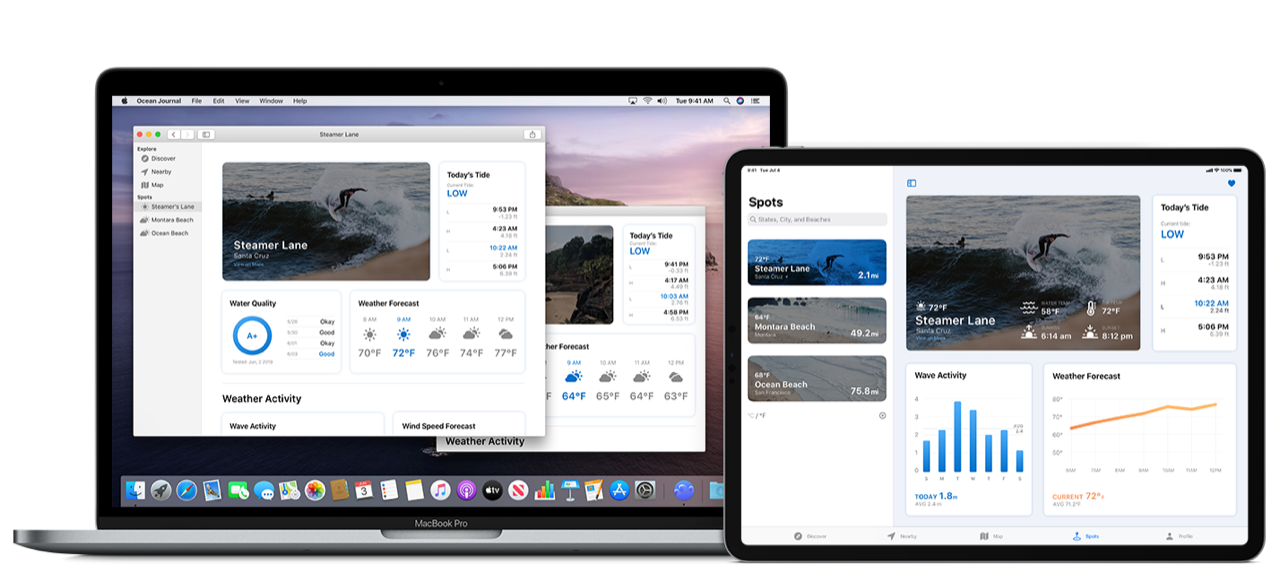
When you use Mac Catalyst to create a Mac version of your iPad app, you make your app available to a new audience while giving existing users the opportunity to enjoy it in a new environment.
당신이 아이패드 앱의 맥 버전을 만들기 위해 Mac Catalyst를 사용할 때, 기존의 사용자에게 새로운 환경에서 즐길 수 있는 기회를 주면서 새로운 사용자들이 앱을 사용할 수 있도록 해야 합니다.
For developer guidance, see Creating a Mac Version of Your iPad App.
아이패드 앱의 맥 버전을 만드는 것과 관련된 개발자 가이드는 다음 문서를 참조하세요.
Before You Start
Most iPad apps are great candidates for adaptation, but some rely on iPad features that don’t exist on a Mac. For example, if your app’s essential features require iPad capabilities like gyroscope, accelerometer, or rear camera, iOS frameworks like HealthKit or ARKit, or the app’s main function is something like navigation, it might not be suited for the Mac.
많은 아이패드 앱들은 맥 앱으로의 변환을 위한 자격을 가지고 있지만, 몇몇은 맥에 없는 아이패드의 특징에 의존하고 있습니다. 예를 들어, 당신의 앱의 필수적인 기능이 자이로스코프, 가속도계 또는 후면 카메라와 같이 아이패드 기능, HealthKit 또는 ARKit와 같은 iOS 프레임워크를 필요로 하거나 앱의 주요 기능이 내비게이션과 같은 것이라면, 맥에 적합하지 않을 수 있습니다.
For apps that don’t require iPad-only features, the best way to ensure that your app will work well on a Mac is to make sure it works well on iPad. In particular, your app should:
아이패드 전용 기능이 필요하지 않은 앱의 경우, 앱이 맥에서 잘 작동하는지 확인하는 가장 좋은 방법은 아이패드에서 잘 작동하는지 확인하는 것입니다. 특히, 앱은 다음을 수행해야 합니다:
- Support multitasking. Apps that do a good job scaling the interface to support Split View, Slide Over, and Picture in Picture approach the ultimate goal of supporting the extensive window resizability that Mac users expect.
- 멀티태스킹을 지원하세요. Split View, Slide Over와 Picture in Picture를 지원하는 훌륭한 확장 인터페이스를 수행하는 앱은 맥 사용자들이 기대하는 광범위한 창 재활성화 지원의 궁극적인 목표에 접근합니다.
- Support drag and drop. When you support drag and drop in your iPad app, you get the same support on the Mac for free.
- 드래그 앤 드롭을 지원하세요. 아이패드 앱에서 드래그 앤 드롭을 지원할 때, 맥에서도 자유롭게 같은 기능을 사용할 수 있습니다.
- Respond to keyboard shortcuts, including common macOS shortcuts. Even though a keyboard may not always be available to your iPad app, both iOS and macOS users appreciate using keyboard shortcuts to streamline their interaction with your app.
- 일반적인 macOS 단축키를 포함한 키보드 단축키에 대응하세요. 아이패드 앱에서 키보드를 통해 앱을 항상 이용할 수 있는 것은 아닐지라도, iOS와 macOS 사용자 모두 키보드 단축키를 사용하여 앱과의 상호 작용을 간소화하는 것을 높이 평가합니다.
Plan Enhancements for Your Mac App
When you use Mac Catalyst to create a Mac version of your iPad app, you get automatic support for fundamental Mac features, such as:
당신의 아이패드 앱의 맥용 버전을 만들기 위해 Mac Catalyst를 사용할 때, 다음과 같은 기본적인 맥 기능을 위한 자동적인 지원을 받을 수 있습니다:
- System Preferences
- 시스템 속성
- Keyboard, trackpad, mouse, and Touch Bar input, including key focus and keyboard navigation
- key focus와 키보드 내비게이션을 포함한 키보드, 트랙패드, 마우스 및 터치 바 입력
- Window management
- 창 관리
- Rich text interaction, including copy and paste and contextual menus for editing
- 복사와 붙여 넣기 및 편집을 위한 contextual 메뉴를 포함한 풍부한 텍스트 상호작용
- File management
- 파일 관리
In addition, many system-provided UI elements automatically convert from iOS to macOS. For example, you get macOS-appropriate versions of the following iOS-provided items:
게다가, 시스템에서 제공하는 많은 UI 요소들이 자동으로 iOS에서 macOS로 변환됩니다. 예를 들어, 다음 iOS에서 제공하는 아이템이 macOS에 적절한 버전으로 바뀝니다.
- Split view
- 스플릿 뷰
- File browser
- 파일 브라우저
- Activity view
- 액티비티 뷰
- Form sheet
- 폼 시트
- Contextual actions
- Contextual actions
To ensure that your app gives people a rich Mac experience, it’s essential to enhance this foundation and go beyond simply displaying your iOS UI in a macOS window. Before you dive in and update specific views and controls, become familiar with the main differences between the platforms so that you can create an app that feels at home on the Mac. (For comprehensive design guidance for macOS apps, see macOS Human Interface Guidelines.)
당신의 앱이 사용자들에게 풍부한 맥 경험을 제공하기 위해서, 이런 기반을 강화하고 단순하게 iOS UI를 macOS 창에 보여주는 것을 넘어서는 것은 필수적입니다. 구체적인 뷰와 컨트롤에 집중해서 업데이트하기 전에, 맥에서 집에 있는 듯한 편안한 앱을 제작하기 위해 플랫폼 간의 주요 차이점에 익숙해지세요. (macOS 앱과 관련된 종합적인 디자인 가이드는 다음 문서를 참조하세요.)
iOS and macOS each define design patterns and conventions for user interaction that are rooted in the different ways people use their devices. For example, iOS conventions such as swipe to delete, action sheet commands, and controls at the bottom of the screen are optimized for touch interactions on a handheld device. In a similar way, macOS conventions such as dedicated keys and keyboard shortcuts, menu commands, and controls at the top of the window are optimized for keyboard, mouse, and trackpad interactions and a separate display.
iOS와 macOS는 사용자가 그들의 장치를 사용하는 다른 방식에 뿌리를 둔 사용자 인터랙션을 위한 디자인 패턴과 규약을 각각 정의합니다.
The conventions and design patterns that have the biggest impact on adaptation can be grouped into four key areas.
적응에 가장 큰 영향을 미치는 규약과 디자인 패턴은 4가지 핵심 영역으로 분류될 수 있습니다.
Navigation. Many iOS and macOS apps organize data in similar ways, but they use different controls and visual indicators to help people understand and navigate through the data. For specific guidance, see Adopt macOS App Structure and Navigation Conventions.
내비게이션. 많은 iOS와 macOS 앱은 비슷한 방식으로 데이터를 조직화하지만, 사용자가 데이터를 통해 이해하거나 탐색하는 데 돕기 위해서 서로 다른 controls와 시각적인 indicators를 사용합니다. 구체적인 가이드는 다음 문서를 참조하세요.
User input and interactions. Although both iPad and Mac accept user input from a range of devices — such as the Multi-Touch display, keyboard, mouse, and trackpad — touch interactions inform iOS conventions, whereas keyboard and mouse interactions originated the conventions for macOS. For related guidance, see Support macOS User Interactions.
사용자 입력 및 상호작용. 아이패드와 맥 모두 다양한 장치 - 멀티 터치 화면, 키보드, 마우스, 트랙패드 등 -로부터 사용자의 입력을 허용하지만, 터치 상호 작용은 iOS 규칙을 알려줍니다. 반면, 키보드와 마우스는 상호작용은 macOS 규칙에서 비롯되었습니다. 관련된 가이드는 다음 문서를 참조하세요.
Menus. Mac users are familiar with the persistent menu bar and expect to find all app commands in menu bar menus. iOS, on the other hand, doesn’t have a persistent menu bar, and iOS users expect to find app commands in the app’s UI. For related guidance, see Put App Commands into Menus.
메뉴. 맥 사용자들은 영구적인 메뉴 바에 친숙하고, 메뉴 바의 메뉴에서 모든 앱의 커맨드를 찾을 수 있기를 기대합니다. 그와 반대로 iOS는 영구적인 메뉴 바를 가지고 있지 않으며, iOS 사용자들은 앱의 UI에서 모든 앱 커맨드를 찾을 수 있기를 기대합니다. 관련된 가이드는 다음 문서를 참조하세요.
Content scaling. Text in the macOS version of an iPad app looks the same as it does in iOS because SF fonts are available on both platforms. However, the baseline font size in iOS is 17 pt, whereas the most common font size in macOS is 13 pt. To ensure that your text and interface elements are consistent with the macOS display environment, iOS views automatically scale down to 77%. For related guidance, see Typography.
콘텐츠 확장. 아이패드 앱의 macOS 버전에서 텍스트는 iOS의 그것과 똑같아 보이는데 그 이유는 SF 폰트를 두 플랫폼 모두에서 사용할 수 있기 때문입니다. 하지만, iOS의 baseline 폰트는 17 pt인 반면에, macOS의 가장 일반적인 폰트 크기는 13 pt입니다. 텍스트와 인터페이스 요소가 macOS 화면 환경에서 일관성 있도록 유지하기 위해서, iOS 뷰는 자동으로 크기를 77%로 줄입니다. 관련된 가이드는 다음 문서를 참조하세요.
In addition to adopting macOS interaction and design conventions, you need to update your visual design and layout to take advantage of the wider Mac screen in ways that give macOS users a great experience. For example, you might:
macOS 인터랙션과 디자인 규칙을 채택하는 것 외에도, 당신은 당신의 시각적인 디자인과 레이아웃을 업데이트해서 더 넓은 맥 화면을 이용함으로써 macOS 사용자에게 좋은 경험을 제공할 필요가 있습니다. 예를 들어, 다음과 같습니다:
- Divide a single column of content and actions into multiple columns
- 내용과 수행하는 하나의 열을 여러 열로 나눌 수 있습니다
- Present an inspector UI next to the main content instead of within a popover
- 팝업창이 아닌 주요 콘텐츠 옆에 인스팩터 UI를 표시할 수 있습니다
- Simultaneously show two or more levels of an app’s hierarchy
- 두 개 이상의 앱의 계층 수준을 동시에 보여줄 수 있습니다.
For more guidance, see Visual Design Considerations.
Visual Design Considerations와 관련된 문서를 다음을 참조하세요.
Ideally, viewing your iPad app from the perspective of macOS design conventions can suggest ways to improve the iOS version, too. Although you want to make sure that each version remains true to the conventions of its platform, take this opportunity to revisit the design of your original app. Especially if your iPad app originated on iPhone, consider reassessing the ways you lay out views and controls to see if there are places where you can make better use of the large iPad screen.
이상적으로, macOS 디자인 규칙의 관점에서 아이패드 앱을 보는 것은 iOS 버전의 개선할 수 있는 방식을 제안할 수 있습니다. 각 버전이 해당 플랫폼의 규약을 준수하는지 확인하고 싶더라도, 이 기회로 기존의 앱 디자인을 다시 살펴보세요. 특히, 아이폰에서 시작된 아이패드 앱이라면, 큰 아이패드 화면을 더 잘 활용할 수 있는 공간이 있는지 확인하기 위해서 뷰와 컨트롤을 배치하는 방법을 재평가해보세요.
Adopt macOS App Structure and Navigation Conventions
Well-designed app navigation reflects the structure of the data and supports the main purpose of the app in ways that follow the platform’s conventions. To help macOS users feel at home in your app, you need to translate the iOS navigation conventions to the equivalent macOS conventions.
잘 설계된 앱 내비게이션은 데이터의 구조를 반영하고, 플랫폼의 규약을 따르는 방식으로 앱의 주된 목적을 지원합니다. macOS 사용자들이 앱에서 집에 있는 듯한 편안함을 느끼게 하기 위해서, iOS 내비게이션 규칙을 동일한 macOS 규칙으로 변화시킬 필요가 있습니다.
Most iPad apps use either flat or hierarchical navigation, and some use a combination of both. Flat navigation presents areas of functionality or categories of data as peer groups that are always available. For example, Music and App Store use flat navigation to give people persistent access to high-level areas such as Library, For You, Browse, Today, and Games. Hierarchical navigation presents information in a tree-like organization through which people navigate by choosing one item per view until they reach their destination. In Settings, for example, people can customize text replacements by choosing General > Keyboards > Text Replacement.
대부분의 아이패드 앱은 플랫 또는 계층 내비게이션을 사용하고, 몇몇은 두 구조 모두 사용합니다. 플랫 내비게이션은 기능 영역 또는 데이터 범주를 항상 사용할 수 있는 피어 그룹으로 제시합니다. 예를 들어, 음악 앱 및 앱 스토어는 플랫 내비게이션을 사용하여 사용자가 라이브러리, For You, Browse, Today, Games와 같은 높은 계층의 영역에 지속적인 접근을 할 수 있도록 도와줍니다. 계층 내비게이션은 사용자가 목적지에 도달할 때까지 뷰마다 하나의 아이템을 선택하여 탐색하는 트리 같은 조직으로 정보를 제공합니다. 예를 들어, 설정에서 사용자는 '일반 - 키보드 - 텍스트 대체'를 선택함으로써 텍스트 대체를 사용자화 할 수 있습니다.
Typically, iPad apps use the following UIKit controls to implement navigation:
대표적으로, 아이패드 앱들은 내비게이션을 구현하기 위해서 다음 제시되는 UIKit 컨트롤을 사용합니다.
- Tab bar. A tab bar supports flat navigation by displaying top-level categories in a persistent bar at the bottom of the screen.
- 탭 바. 탭 바는 화면의 아래에 가장 높은 단계의 분류를 persistent 바에 보여줌으로써 플랫 내비게이션을 지원합니다.
- Page control. A page control displays dots at the bottom of the screen that indicate the position of the current page in a flat list of pages.
- 페이지 컨트롤. 페이지 컨트롤은 페이지의 플랫 목록에서 현재 페이지의 위치를 나타내는 점들을 화면의 아래에 보여줍니다.
- Split view. A split view enables hierarchical navigation by presenting items and functionality in a primary view and a secondary (or detail) view. When people select an item in the primary view, a split view displays the content associated with that item in the secondary view.
- 스플릿 뷰. 스플릿 뷰는 primary 뷰와 secondary(또는 detail) 뷰에서 아이템과 기능을 나타냄으로써 계층 내비게이션을 사용합니다. 사용자가 primary 뷰에서 아이템을 선택할 때, 스플릿 뷰는 secondary 뷰에서 아이템과 연관된 콘텐츠를 보여줍니다.
If you use a tab bar in your iPad app, consider using a segmented control or the sidebar background style in a split view controller. Both items are similar to navigation conventions in Mac-style windows. To choose between these items, consider the following:
아이패드 앱에서 탭 바를 사용하면, 스플릿 뷰 컨트롤러에서 segmented control이나 sidebar background style 사용을 고려하세요. 맥 스타일의 창에서 두 항목 모두 내비게이션 규칙과 비슷합니다. 이들 항목 중에서 선택하기 위해서, 다음을 고려하세요.
- A segmented control and a tab bar both accommodate similar interactions — such as mutually exclusive selection — so a segmented control is a good alternative for a straightforward adaptation. A segmented control is ideal for iPad apps that don’t have a lot of hierarchy within each tab, because it can be paired with a sidebar to enable navigation within a tab.
- Segmented control과 탭 바 모두 mutually exclusive selection과 같은 비슷한 인터랙션을 가지고 있어, segmented control이 쉽게 적응하기 위한 좋은 대안입니다. Segmented control은 sidebar와 쌍을 이루어 탭 내에서 탐색할 수 있도록 하여, 각각의 탭 내에 많은 계층을 가지고 있지 않은 아이패드 앱에 이상적입니다.
- A sidebar displays a list of top-level items, each of which can disclose a list of child items. Using a sidebar streamlines navigation because you can let people view each tab’s contents within the sidebar. Sidebars are a good choice for displaying app-defined or user-defined categories that don’t change very often. For example, the Following and Suggested categories in the News sidebar don’t change, even though people can change the items listed in each category.
- Sidebar는 목록의 최상단의 항목을 보여주는데, 각각의 항목은 하위 항목의 목록을 보여줄 수 있습니다. Sidebar를 사용하는 것은 사용자가 sidebar 안에 있는 각각의 탭의 내용을 볼 수 있도록 하여, 탐색을 간소화합니다. Sidebars는 자주 바뀌지 않는 앱에서 제공하거나 사용자가 정의한 분류를 보여주기 위한 좋은 선택입니다. 예를 들어, 뉴스 앱 sidebar의 팔로잉 및 제안하는 카테고리에 나열된 항목은 변경될 수 있지만, 카테고리는 변하지 않습니다.
You can also combine a segmented control and a sidebar in your app. For example, you might use a segmented control to contain the tabs, and a sidebar to display the contents of each tab. Regardless of how you adapt the tab bar, be sure to give people quick access to each tab’s content through the macOS View menu. To learn more about menus, see Put App Commands into Menus.
또한, 당신은 segmented control과 sidebar를 앱 내에서 같이 사용할 수 있습니다. 예를 들어, 탭들을 포함하기 위해서 segmented control을 사용하고, 각각의 탭의 내용들을 보여주기 위해서 sidebar를 사용하는 경우와 같습니다. 탭 바를 어떻게 조정하든지, 사용자가 macOS 화면 메뉴를 통해 각각의 탭의 콘텐츠에 빠르게 접근할 수 있도록 하세요. 메뉴에 관한 더 많은 내용은, 다음 문서를 참조하세요.
If you use a split view in your iPad app, macOS automatically translates it to a split view in the Mac version of your app. On both platforms, a primary view is a good choice for presenting a list of items that can vary — such as the list of mailboxes in Mail — because it lets you include labels and icons and it supports sorting and filtering. However, if your content hierarchy is deeper than two levels, the middle levels between the primary view and the current detail view aren’t visible in the Mac-style window. To ensure that people can retrace their steps, include a back button in the toolbar.
아이패드 앱에서 split view를 사용하면, macOS는 자동으로 당신의 앱의 맥 버전에서의 split view로 변경합니다. 두 플랫폼 모두, primary view는 메일 앱 수신함의 목록과 같이 다양화할 수 있는 아이템의 목록을 나타내는 데 좋은 선택입니다. 그 이유는, primary view는 레이블과 아이콘을 포함할 수 있도록 하고, 정렬과 필터링을 제공하기 때문입니다. 하지만, 콘텐츠가 계층이 두 단계보다 더 깊다면, primary view와 현재 detail view 간의 중간 계층이 맥 스타일의 창에서는 보이지 않습니다. 사용자가 단계를 되짚어가는 것을 돕기 위해서, toolbar에 뒤로 가기 버튼을 포함시키세요.
If you use a page control, or another way to enable lateral navigation, give people specific controls to view pages. If you support this type of lateral navigation, you can help people navigate through pages in your Mac-style window by displaying a Next/Previous button in the toolbar and adding navigation commands to a menu bar menu. For example, Stocks in macOS displays both a Back button in the toolbar and Next Story and Previous Story commands in the View menu.
Page control을 사용하거나 옆으로 이동하는 내비게이션을 활성화하기 위한 다른 방식을 사용한다면, 사용자에게 화면을 볼 수 있는 구체적인 컨트롤을 제공하세요. 옆으로 이동하는 내비게이션의 종류를 지원하는 경우, toolbar에 다음/이전 버튼을 보여주고, menu bar menu에 내비게이션 커맨드를 추가함으로써 맥 스타일의 창에서 사용자가 페이지들 사이를 이동하는데 도움을 줄 수 있습니다. 예를 들어, macOS에서 주식 앱은 toolbar의 뒤로 가기 버튼과 View menu 속의 Next Story와 Previous Story 커맨드를 보여줍니다.
If you support multiple windows in your iPad app, you get support for multiple windows in the macOS version, too. In addition, many macOS apps let people open documents or other content in a new tab instead of in a new window. For example, people can open a different webpage per tab in a Safari window or a different file system location per tab in a Finder window. When people use System Preferences to prefer tabs over windows, the system dynamically adds the relevant menu items to an app’s menus, such as View > Show Tab Bar and Window > Show Next Tab.
아이패드 앱에서 여러 개의 창을 지원한다면, macOS 버전 또한 여러 개의 창의 지원하세요. 게다가, 많은 macOS 앱은 사용자가 새로운 창보다 새로운 탭에서 문서나 다른 콘텐츠를 열 수 있도록 허용합니다. 예를 들어, 사용자들은 사파리 창에서 각 탭마다 다른 웹 페이지를 열 수 있고, Finder 창에서 각 탭마다 다른 파일 시스템 위치를 열 수 있습니다. 사용자가 창보다 탭을 선호하여 시스템 환경 설정을 사용할 때, 시스템은 View > Show Tab Bar and Window > Show Next Tab과 같이 앱의 메뉴에 관련된 메뉴 항목을 동적으로 추가합니다.
Support macOS User Interactions
Selection persistence is a fundamental difference in user interaction between iOS and macOS. Because many macOS users expect to control apps and the system using only the keyboard, the selected state of objects must persist so that people can use one sequence of key presses to select an object and a second sequence to act upon it. In contrast, iOS users expect to act upon an object without selecting it first, so objects don’t need to retain their selected state. As a general rule, iOS apps don’t tend to be optimized for keyboard interactions.
Selection persistence는 사용자 인터랙션에서 iOS와 macOS의 기본적인 차이점입니다. 많은 macOS 사용자들은 키보드만 사용해서 앱과 시스템을 제어하기를 원하기 때문에, 사용자들이 키를 누름으로써 오브젝트를 선택하는 과정과 그것을 작동시키는 다음 과정을 위해 오브젝트들의 선택된 상태는 지속되어야 합니다. 반면에, iOS 사용자들은 선택하는 과정 없이 동작하기를 기대하기 때문에, 오브젝트의 선택된 상태가 필요하지 않습니다. 일반적으로, iOS 앱들은 키보드 인터랙션에 최적화되지 않는 경향이 있습니다.
Here are some ways that different interaction conventions can affect the user experience:
사용자 경험에 영향을 미칠 수 있는 몇 가지 다른 인터랙션 규칙이 있습니다:
- macOS users often want Next and Previous buttons in place of iPad or trackpad gestures such as swiping among pages.
- macOS 사용자들은 종종 아이패드나 트랙패드의 페이지 내 스와이프와 같은 것을 대신해서 다음과 이전 버튼을 원합니다.
- On a Mac, people expect to use the Delete key or select a Delete command in a menu, so displaying a Delete button in the UI is usually unnecessary.
- 맥에서, 사용자는 삭제 키를 사용하거나 메누엣 삭제 커맨드를 선택하기 기대하기 때문에, UI에서 삭제 버튼을 보여주는 것은 일반적으로 불필요합니다.
- iOS users are accustomed to pulling down on a view to refresh the contents. In contrast, Mac users expect to use a menu command, such as Check for New Content.
- iOS 사용자들은 콘텐츠를 새로고침 하기 위해서 화면을 잡아당기는 것에 익숙합니다. 반면에, 맥 사용자들은 Check for New Content와 같은 메뉴의 커맨드 사용을 기대합니다.
As you translate iPad user interaction patterns to Mac interactions, focus on letting people manipulate objects in ways that adhere to platform conventions.
아이패드 사용자 인터랙션 패턴을 맥 인터랙션으로 변환했던 것처럼, 플랫폼 규약을 준수하는 방식으로 사용자가 오브젝트를 다룰 수 있도록 하는 데 집중하세요.
Keyboard Input
Be prepared to support keyboard conventions that let people change a persistent selection by using arrow keys or by pressing letter and number keys.
사용자가 화살표 키를 사용하거나 문자 및 숫자 키를 눌러 선택을 변경할 수 있는 키보드 규칙 지원을 준비하세요.
If it makes sense in your app, take advantage of the fact that Mac users can easily use the keyboard and the mouse or trackpad at the same time.
앱에 맞는다면, 맥 사용자들이 키보드와 마우스 또는 트랙패드를 동시에 쉽게 사용한다는 점을 이용하세요.
If you implement UIKeyCommand in your iPad app to define keyboard sequences for commands, the macOS version of your app translates these shortcuts to the menus. For example, you should map each major view area, such as each tab, to the keyboard shortcuts ⌘1, ⌘2, and so on for display in the View menu of the macOS version of your app.
아이패드 앱에 UIKeyCommand를 구현하여 명령에 대한 키보드 시퀀스를 정의하면, macOS 버전의 앱은 이런 단축키들을 메뉴로 변환합니다. 예를 들어, macOS 버전의 보기 메뉴에 표시할 수 있도록, 각 탭과 같은 주요 보기 영역에 키보드 단축키 ⌘1, ⌘2를 맵핑해야 합니다.
If there’s a Delete button in the UI of your iPad app, consider removing it from the macOS version and letting people use the Delete key or the app’s Edit > Delete menu command instead.
아이패드 앱의 UI에 삭제 버튼이 있다면, macOS 버전에서는 사용자가 삭제 키나 편집 - 삭제 명령을 대신 사용하여 제거하는 것을 고려하세요.
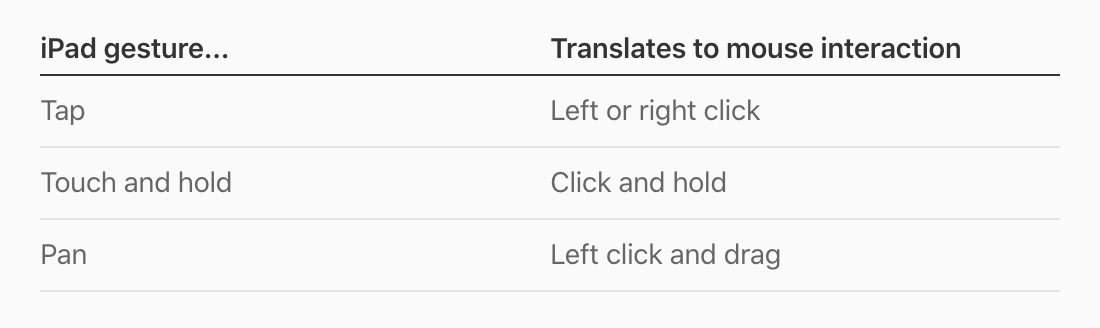
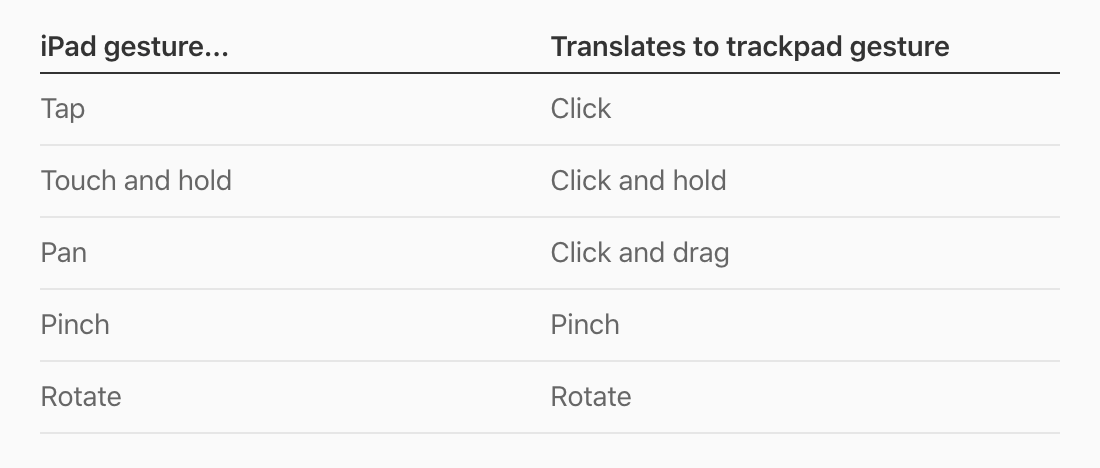
Gestures
When your iPad app runs in macOS, most gestures convert automatically. For example:
아이패드 앱이 macOS에서 실행될 때, 대부분의 제스처들은 자동으로 변환됩니다. 예를 들어 다음과 같습니다.
DEVELOPER NOTE
The two touches in the pinch and rotate gestures get sent to the view under the pointer, not the view under each touch.
pinch와 rotate 제스처와 같은 두 개의 터치는 각 터치 차래의 뷰가 아닌 포인터 아래의 뷰로 전송됩니다.
Put App Commands into Menus
On a Mac, the menu bar at the top of the screen gives people a consistent location for commands that control both apps and the system. The menu bar contains the standard and custom menus supplied by the current app, in addition to the Apple menu, which lists system-level commands that are always available. Mac users expect every macOS app to make all its commands available in the menu bar.
맥에서, 화면의 최상단의 메뉴 바는 고정되어 있어 사용자가 앱과 시스템을 제어할 수 있도록 합니다. 메뉴 바는 기본 메뉴와 현재 앱에서 제공된 커스텀 메뉴를 포함하는데, 항상 사용할 수 있는 시스템 수준의 명령어가 애플 메뉴에 나열되어 있습니다.
- App Name
- 앱 이름
- File
- 파일
- Edit
- 편집
- View
- 보기
- Window
- 윈도우
- Help
- 도움말
DEVELOPER NOTE
You must use UICommand to represent each command in your iPad app so that these commands can be put into macOS menu bar menus. To support keyboard shortcuts for commands, use UIKeyCommand.
아이패드 앱 각각의 명령어를 나타내기 위해서 UICommand 사용하여, 명령어들이 macOS의 메뉴바에 포함될 수 있습니다. 명령어들의 키보드 단축키를 지원하기 위해서, UIKeyCommand를 사용하세요.
Because iPad apps use controls to display commands in the main UI, finding a logical and intuitive menu bar location for every app command is a key part of the adaptation process.
아이패드 앱은 메인 UI에서 명령어를 보여주기 위해서 controls를 사용하기 때문에, 모든 앱 명령에 대한 논리적이며 직관적인 메뉴 바 위치를 찾는 것이 적응하기 위한 과정의 가장 중요한 부분입니다.
To design the menu bar menus for the macOS version of your app, start by listing all the actions that people can perform and grouping them into the categories defined by the standard menu bar menus. For example:
macOS 버전의 앱을 위한 menu bar menus를 설계하기 위해서는, 사용자들이 수행할 수 있는 모든 동작들을 나열하는 것으로 시작하고, 표준 menu bar menus를 기준으로 정의된 카테고리로 그룹핑하세요. 예를 들어 다음과 같습니다.
NOTE
Most macOS apps include a View menu and a Window menu. Although these menus may seem similar, they have different purposes. People use the View menu to customize the appearance of app windows and to move among different functional areas, whereas they use the Window menu to navigate, organize, and manage the collection of windows in an app. To learn more, see Menu Bar Menus.
대부분의 macOS 앱들은 View 메뉴와 Window 메뉴를 갖고 있습니다. 이런 메뉴들은 비슷해 보일 수 있으나, 다른 목적이 있습니다. 사용자들은 앱 윈도우의 모양을 커스텀하고 그리고 다른 기능적인 영역 사이를 이동하기 위해서 View 메뉴를 사용하는 반면, Window 메뉴를 사용하여 앱 내의 윈도우의 컬렉션을 탐색하고 조직하며 관리합니다. Menu Bar Menus와 관련된 자세한 내용은 다음 링크를 확인해주세요.
If some of the actions on your list don’t make sense in the standard menu bar menus, you might need to add a custom menu. Mac apps often add a custom menu bar menu for commands that are associated with either a core app object or a core app workflow. For example, Mail in macOS uses the Message and Mailbox menus to list commands that operate on these fundamental app objects. In contrast, Keynote uses the Arrange menu to list commands associated with the core workflow of arranging objects in a slide deck.
리스트에 있는 몇 가지 동작들인 기본 menu bar menus에서 적합하지 않다면, 커스텀 메뉴에 추가하세요. Mac 앱들은 종종 커스텀 menu bar menu에 명령어들을 추가하는데, 이들은 핵심적인 앱 객체 거나 핵심적인 앱 워크플로우와 관계되어 있습니다. 예를 들어, macOS에서 메일 앱은 핵심적인 앱 객체를 동작시키는 명령어를 나열하기 위해서 메시지와 메일함 메뉴를 사용합니다. 대조적으로, 키노트 앱은 슬라이드 덱에서 객체를 정리하는 핵심적인 워크플로우와 관련된 명령어를 나열하기 위해서 Arrange 메뉴를 사용합니다.
After you group your app’s actions into menus, you need to order the items in each menu in a way that makes sense. Each standard menu defines a recommended order for items, so it’s important to follow this order for the items that you support. For example, Mac users expect the File menu to present items in this order:
앱의 동작들은 메뉴로 그룹화한 후, 적합한 방식으로 각각의 메뉴의 항목들을 순서를 정해야 합니다. 각각의 표준 메뉴는 항목에 대한 권장하는 순서를 정의하기 때문에, 지원하는 항목에 대한 이 순서를 따르는 것이 중요합니다. 예를 들어, Mac 사용자들은 파일 메뉴가 다음과 같은 순으로 나타나기를 예상합니다.
- New...
- 새...
- Open...
- ... 열기
- Open Recent
- 최근에 사용한 파일 열기
- Close
- 닫기
In a custom menu bar menu, you should order the items according to importance, frequency of use, or another scheme that makes sense in your app. Menu bar menus can also contain submenus and separators that help group items in logical ways. To learn more about these menu components, see Menu Anatomy.
커스텀 menu bar menu에서, 중요도, 사용 빈도, 또는 앱에서 의미가 있는 다른 구성에 따라 항목들의 순서를 정해야 합니다. Menu bar menus는 또한 하위 메뉴와 논리적인 방식으로 항목들을 그룹화하는데 돕는 분리자를 포함할 수 있습니다. Menu Anatomy 문서를 통해 이런 메뉴 구성 요소들과 관련된 더 많은 내용을 확인할 수 있습니다.
Also, it’s important to support keyboard shortcuts for all common commands in your menus so that both Mac users and iPad users who use keyboards can benefit. In addition to enabling the shortcuts for standard menu items, you can also define shortcuts for custom items. If custom menu items make sense in your app, be sure to review the guidance for creating custom keyboard shortcuts in Defining Keyboard Shortcuts.
또한, 키보드를 사용하는 맥 또는 아이패드 사용자가 이점을 얻을 수 있도록, 메뉴에서 자주 사용되는 명령어의 키보드 단축키를 지원하는 것은 중요합니다. 기본 메뉴 항목을 위한 단축키 활성화 외에, 커스텀 항목에 대한 단축키도 정의할 수 있습니다. 앱에서 커스텀 메뉴 항목이 적합하다면, 다음 문서에서 커스텀 키보드 단축키 만들기를 위한 가이드를 확인하세요.
Contextual Menus
Contextual menus help people discover the actions that they can perform on an object without opening a menu bar menu. If you support context menus in your iPad app, the system automatically converts them to contextual menus in the macOS version of your app.
Contextual menus는 menu bar menu를 열지 않고, 사용자가 객체에서 수행할 수 있는 동작들을 발견하도록 돕습니다. 아이패드 앱에서 context menus를 지원한다면, 시스템은 자동으로 macOS 버전의 앱의 contextual menus로 변환합니다.
To give Mac users the best experience, look for additional places to support contextual menus. For example, if there are common actions that people can perform on an object in your app, add a contextual menu that lists these actions. You can also add a contextual menu to a view that represents an object — for example, folder objects in the Finder support contextual menus that offer actions like Open in New Tab, Rename, and Duplicate.
맥 사용자들에게 최고의 경험을 선사하기 위해서, contextual menus를 지원할 수 있는 추가적인 영역들을 찾아보세요. 예를 들어, 앱에서 사용자들이 객체에서 수행할 수 있는 일반적인 동작이 있다면, 이런 동작들을 나열한 contexual menu를 추가하세요. 또한 객체를 나타내는 뷰에 contextual menu를 추가할 수 있습니다. 예를 들어, Finder에 있는 폴더 객체는 새로운 탭에서 열기, 이름 변경, 복제와 같은 동작들을 제공하는 contextual menus를 지원합니다.
Visual Design Considerations
To help your iPad app look great when it runs in macOS, take into account the platform differences in the following areas of visual design.
macOS에 맞게 아이패드 앱이 실행되는 것을 돕기 위해서, 다음의 시각적인 디자인의 영역에서 플랫폼의 차이를 고려하세요.
Layout
Mac users expect to resize app windows to just about any size from full screen to as small as the app permits. To support this type of infinite resizability — and to take advantage of the Mac’s wider display — use the regular width and regular height size classes and consider reflowing elements in your window’s content area to a side-by-side arrangement when necessary.
맥 유저들은 앱 창의 크기를 전체 화면부터 앱이 허용하는 한 작은 사이즈로 조정하기를 기대합니다. 이런 무제한의 조정할 수 있는 형태를 지원하고 맥의 넓은 디스플레이의 이점을 활용하기 위해서, 일반적인 너비와 높이 클래스를 사용하고, 필요하다면 윈도우 콘텐츠 영역의 요소를 나란히 배치하도록 조정하는 것을 고려하세요.
As much as possible, adopt a top-down layout. macOS apps place the most important actions and content near the top of the window. If your iPad app provides controls in a toolbar or navigation bar, put these controls in the window toolbar of the macOS version of your app.
가능한 탑 다운 레이아웃을 채택하세요. macOS 앱들은 대부분의 중요한 동작과 콘텐츠를 창의 최상단에 위치시킵니다. 아이패드 앱이 툴바나 내비게이션 바에 controls를 제공한다면, 이러한 controls를 macOS버전 앱의 윈도우 툴바에 놓으세요.
Consider moving controls from the main UI of your iPad app to the toolbar of your macOS window. Also, list the commands associated with these controls in the menus of your macOS app’s menu bar.
controls를 아이패드 주요 UI에서 macOS 윈도우 툴바로 옮기는 것을 고려하세요. 또한, macOS 앱의 메뉴 바의 메뉴에 이러한 controls와 관련된 명령어들을 나열하세요.
NOTE
In macOS, a toolbar button is always visible, but the current context might make it unavailable; in iOS, a toolbar button is always available, but the current context might remove it from the toolbar. For example, if your iPad app includes a toolbar button that works in only one tab, the macOS version displays the button as unavailable in all other tabs. To avoid confusing people, it can work better to use a "gear" button in the toolbar instead, because the items in a gear button's menu differ depending on the current app section.
Relocate buttons from the left or right edge of the screen. On iPad, placing buttons on the middle left or middle right screen edges can help people reach them, but on a Mac, this ergonomic consideration doesn’t apply. You may want to relocate controls to the top or bottom edge of the content area or put them in the toolbar of your macOS window.
화면의 왼쪽이나 오른쪽 가장자리로부터 버튼들을 다시 배치하세요. 아이패드에서 화면 가장 자리 중앙 왼쪽이나 오른쪽에 위치한 버튼들은 사용자의 접근성을 도울 수 있지만, 맥에서는 이러한 인체공학적인 고려가 적용되지 않습니다. controls를 콘텐츠 영역의 최상단 혹은 최하단 가장자리에 재배치하거나 macOS 윈도우의 툴바에 위치시키세요.
Color
Use the system selection color on both platforms. In general, iOS apps define the colors used to tint buttons and to indicate selection, but in macOS, people expect to use System Preferences to choose the selection and button colors they want.
두 플랫폼 모두 시스템에서 선택할 수 있는 색을 사용하세요. 일반적으로, iOS 앱들은 버튼 색을 지정하고 선택을 나타내는 데 사용되는 색을 정의하지만, macOS에서는 사용자가 시스템 속성을 사용하여 선택과 그들이 원하는 버튼 색을 정하기 기대합니다.
The dynamic system colors designed for iOS backgrounds automatically map to appropriate macOS equivalents, as shown below.
iOS 배경을 위해 설계된 dynamic system colors는 아래 표에서 보이는 것과 같이 자동으로 macOS에 적합하게 연결합니다.
Other semantically defined iOS colors — such as the system colors and the label and separator colors — map to similarly named macOS colors. For guidance, see System Colors (macOS) and Dynamic System Colors (macOS).
ㄴsystem colors와 label과 separator colors와 같이 다른 의미상으로 정의된 iOS colors은 비슷하게 명명된 macOS colors와 연결됩니다. System Colors (macOS)와 Dynamic System Colors (macOS)와 관련된 가이드는 다음 문서를 참조하세요.
Don’t tint buttons in table rows. In your iPad app, you use a tint to show that buttons in table rows are active, but in macOS, tinted buttons in table rows look out of place.
테이블 행의 버튼에는 색을 지정하지 마세요. 아이패드 앱에서, 테이블의 행에 있는 버튼이 활성화되어 있는 것을 보여주기 위해서 색조를 사용하지만, macOS에서 테이블 행의 색이 있는 버튼은 어울리지 않게 보입니다.
Typography
Although the automatic scaling performed by the system gives good results without requiring you to specify different font values on both platforms, you might not get the best results in every situation.
시스템에 의해 자동으로 크기가 조절되는 것은 양쪽 플랫폼 모두 구체적인 다른 폰트 값을 요구하지 않고 좋은 결과를 제공하지만, 모든 상황에서 최상의 결과를 얻는 것은 아닙니다.
Make sure small type is legible on the Mac. Be prepared to increase some of the smallest font sizes you use in your iPad app so that all text remains legible in the macOS version. Also, note that Dynamic Type is not supported in macOS.
맥에서 작은 글씨를 읽을 수 있는지 확인하세요. 아이패드 앱에서 사용하는 가장 작은 폰트 크기를 키워 macOS 버전에서도 모든 텍스트를 읽을 수 있도록 준비하세요. 또한 Dynamic Type이 macOS에서는 지원되지 않는다는 것을 언급하세요.
Custom Icons and Glyphs
Create a macOS version of your app icon. Great macOS app icons are noticeably different from great iOS app icons — for example, macOS icons can have nonrectangular shapes and are often skewed and rotated. By default, macOS applies a drop shadow to your iOS app icon so that it feels more at home on a Mac, but it’s better to design a Mac-specific version of your app icon. To learn more about how to approach the design of a macOS app icon, see App Icon.
macOS 버전의 앱 아이콘을 제작하세요. 최고의 macOS 앱 아이콘은 최고의 iOS 아이콘과 주목할 만큼 다릅니다. 예를 들어, macOS 아이콘들은 사각형이 아닌 모양을 지닐 수 있고, 종종 비스듬하거나 회전합니다. 기본적으로, macOS는 iOS 앱 아이콘에 그림자 효과를 적용하여 맥에서 집에 있는 듯한 느낌을 주지만, 당신의 앱 아이콘을 맥용 버전을 위한 것으로 디자인하면 더 좋습니다. macOS 앱 아이콘의 디자인에 접근하는 방법은 다음 문서를 참조하세요.
Create platform-specific glyphs, if necessary. If your iPad app uses custom glyphs that reference the platform in some way, create new glyphs that feel at home on the Mac. Xcode provides a separate asset catalog you can use in your iPad app for macOS-specific glyphs.
필요하다면, 플랫폼에 초점을 맞춘 기호를 제작하세요. 아이패드 앱이 여러 방식으로 플랫폼을 참조하는 커스텀 기호를 사용한다면, 맥에서 집에 있는 듯 편안한 새로운 기호를 제작하세요. Xcode는 아이패드에서 사용할 수 있는 macOS 전용의 별도 asset 카탈로그를 제공합니다.
Preferences
If you supply app settings that appear in the iOS Settings app, macOS automatically displays these items in a preferences window in the Mac version of your app. By default, macOS adds a toolbar button to the preferences window for each item in your iOS settings, giving it the standard system preferences icon and the title you used for the item’s view in the Settings app.
iOS 설정 앱에서 나타나는 앱 설정을 제공한다면, macOS는 자동으로 이러한 항목들을 맥 버전의 preferences window에서 보여줍니다. 기본적으로, macOS는 설정 앱에서 사용되는 항목들의 화면들에 기본 시스템 속성 아이콘과 제목을 부여하여, preferences window에 iOS 설정에 있는 각 항목들을 툴바 버튼에 추가합니다.
As Mac users expect, your preferences window appears when they choose the Preferences menu item in your app menu. However, there are a few ways you can refine the display of your settings items and make your app’s preferences experience feel more Mac-like.
맥 사용자들이 예상하는 것처럼, 앱 메뉴에서 기본 설정 메뉴 항목을 선택하면 기본 설정 창이 나타납니다. 하지만, 설정 항목의 표시를 세분화하여 앱의 기본 설정을 Mac처럼 느끼게 하는 몇 가지 방법이 있습니다.
Customize the icon for each item’s toolbar button. Because macOS automatically uses the standard system preferences icon for your settings items, people will have to read each toolbar button’s title to distinguish among multiple items. To improve this experience, supply a custom icon for each settings item.
각 항목의 툴바 버튼 아이콘을 커스텀하세요. macOS는 자동으로 기본 시스템 설정 아이콘을 사용하기 때문에, 사용자들은 다른 여러 항목들 중에서 구별하기 위해 각 툴바 버튼의 제목을 읽어야 합니다. 이러한 경험을 향상시키기 위해서, 각 설정 항목의 커스텀 아이콘을 사용하세요.
Make switch controls easier for macOS users to understand. Unlike iPad apps, a macOS app often displays a confirmation alert when someone uses a switch to make changes in System Preferences. In addition, a switch in iOS Settings can include a small amount of text that provides more information about how the switch affects the user experience. In the Mac version of your app, you can provide a brief description to accompany a macOS switch and you can specify content to display in a confirmation alert when people use it to change a setting. For developer guidance, see Displaying a Preferences Window.
macOS 사용자들이 이해할 수 있도록 스위치 controls을 더 쉽게 만드세요. 아이패드 앱과 달리, macOS 앱은 종종 시스템 속성에서 변경하기 위해 스위치를 사용하면 확인 창을 보여줍니다. 게다가, iOS 설정 앱에 있는 스위치는 어떻게 스위치가 사용자 경험에 영향을 미치는지와 같은 많은 양의 정보를 적은 양의 텍스트에 포함할 수 있습니다. 맥 버전의 앱에서는 macOS 스위취와 함께 간단한 설명을 제공할 수 있고, 사용자가 설정을 변경하기 위해 사용할 때 확인 창을 표시할 콘텐츠를 지정할 수 있습니다. Displaying a Preferences Window와 관련된 개발 가이드는 다음 문서를 참조하세요.
수정해야 할 부분이 있다면 알려주세요!
감사합니다!
'Human Interface Guidelines > 글' 카테고리의 다른 글
| HIG 번역) Bars - Sidebars (0) | 2020.10.26 |
|---|---|
| HIG 번역) Controls - Color Wells (0) | 2020.10.22 |
| HIG 번역) Technologies - Accessibility - Navigation (0) | 2020.09.20 |
| HIG 번역) Technologies - Accessibility - Best Practices (0) | 2020.09.16 |
| HIG 번역) Technologies - Accessibility - Introduction (0) | 2020.09.15 |


댓글