아직 갈 길이 멀었지만, 차근차근해볼게요!
Todo 앱이면 뭐가 있어야 하죠? 네 맞아요~
?
바로 일정을 체크하는 기능입니다~ 그래서 이 기능을 체크 표시로 한 번 해보겠습니다!
체크 표시는 뭐냐면 이겁니다
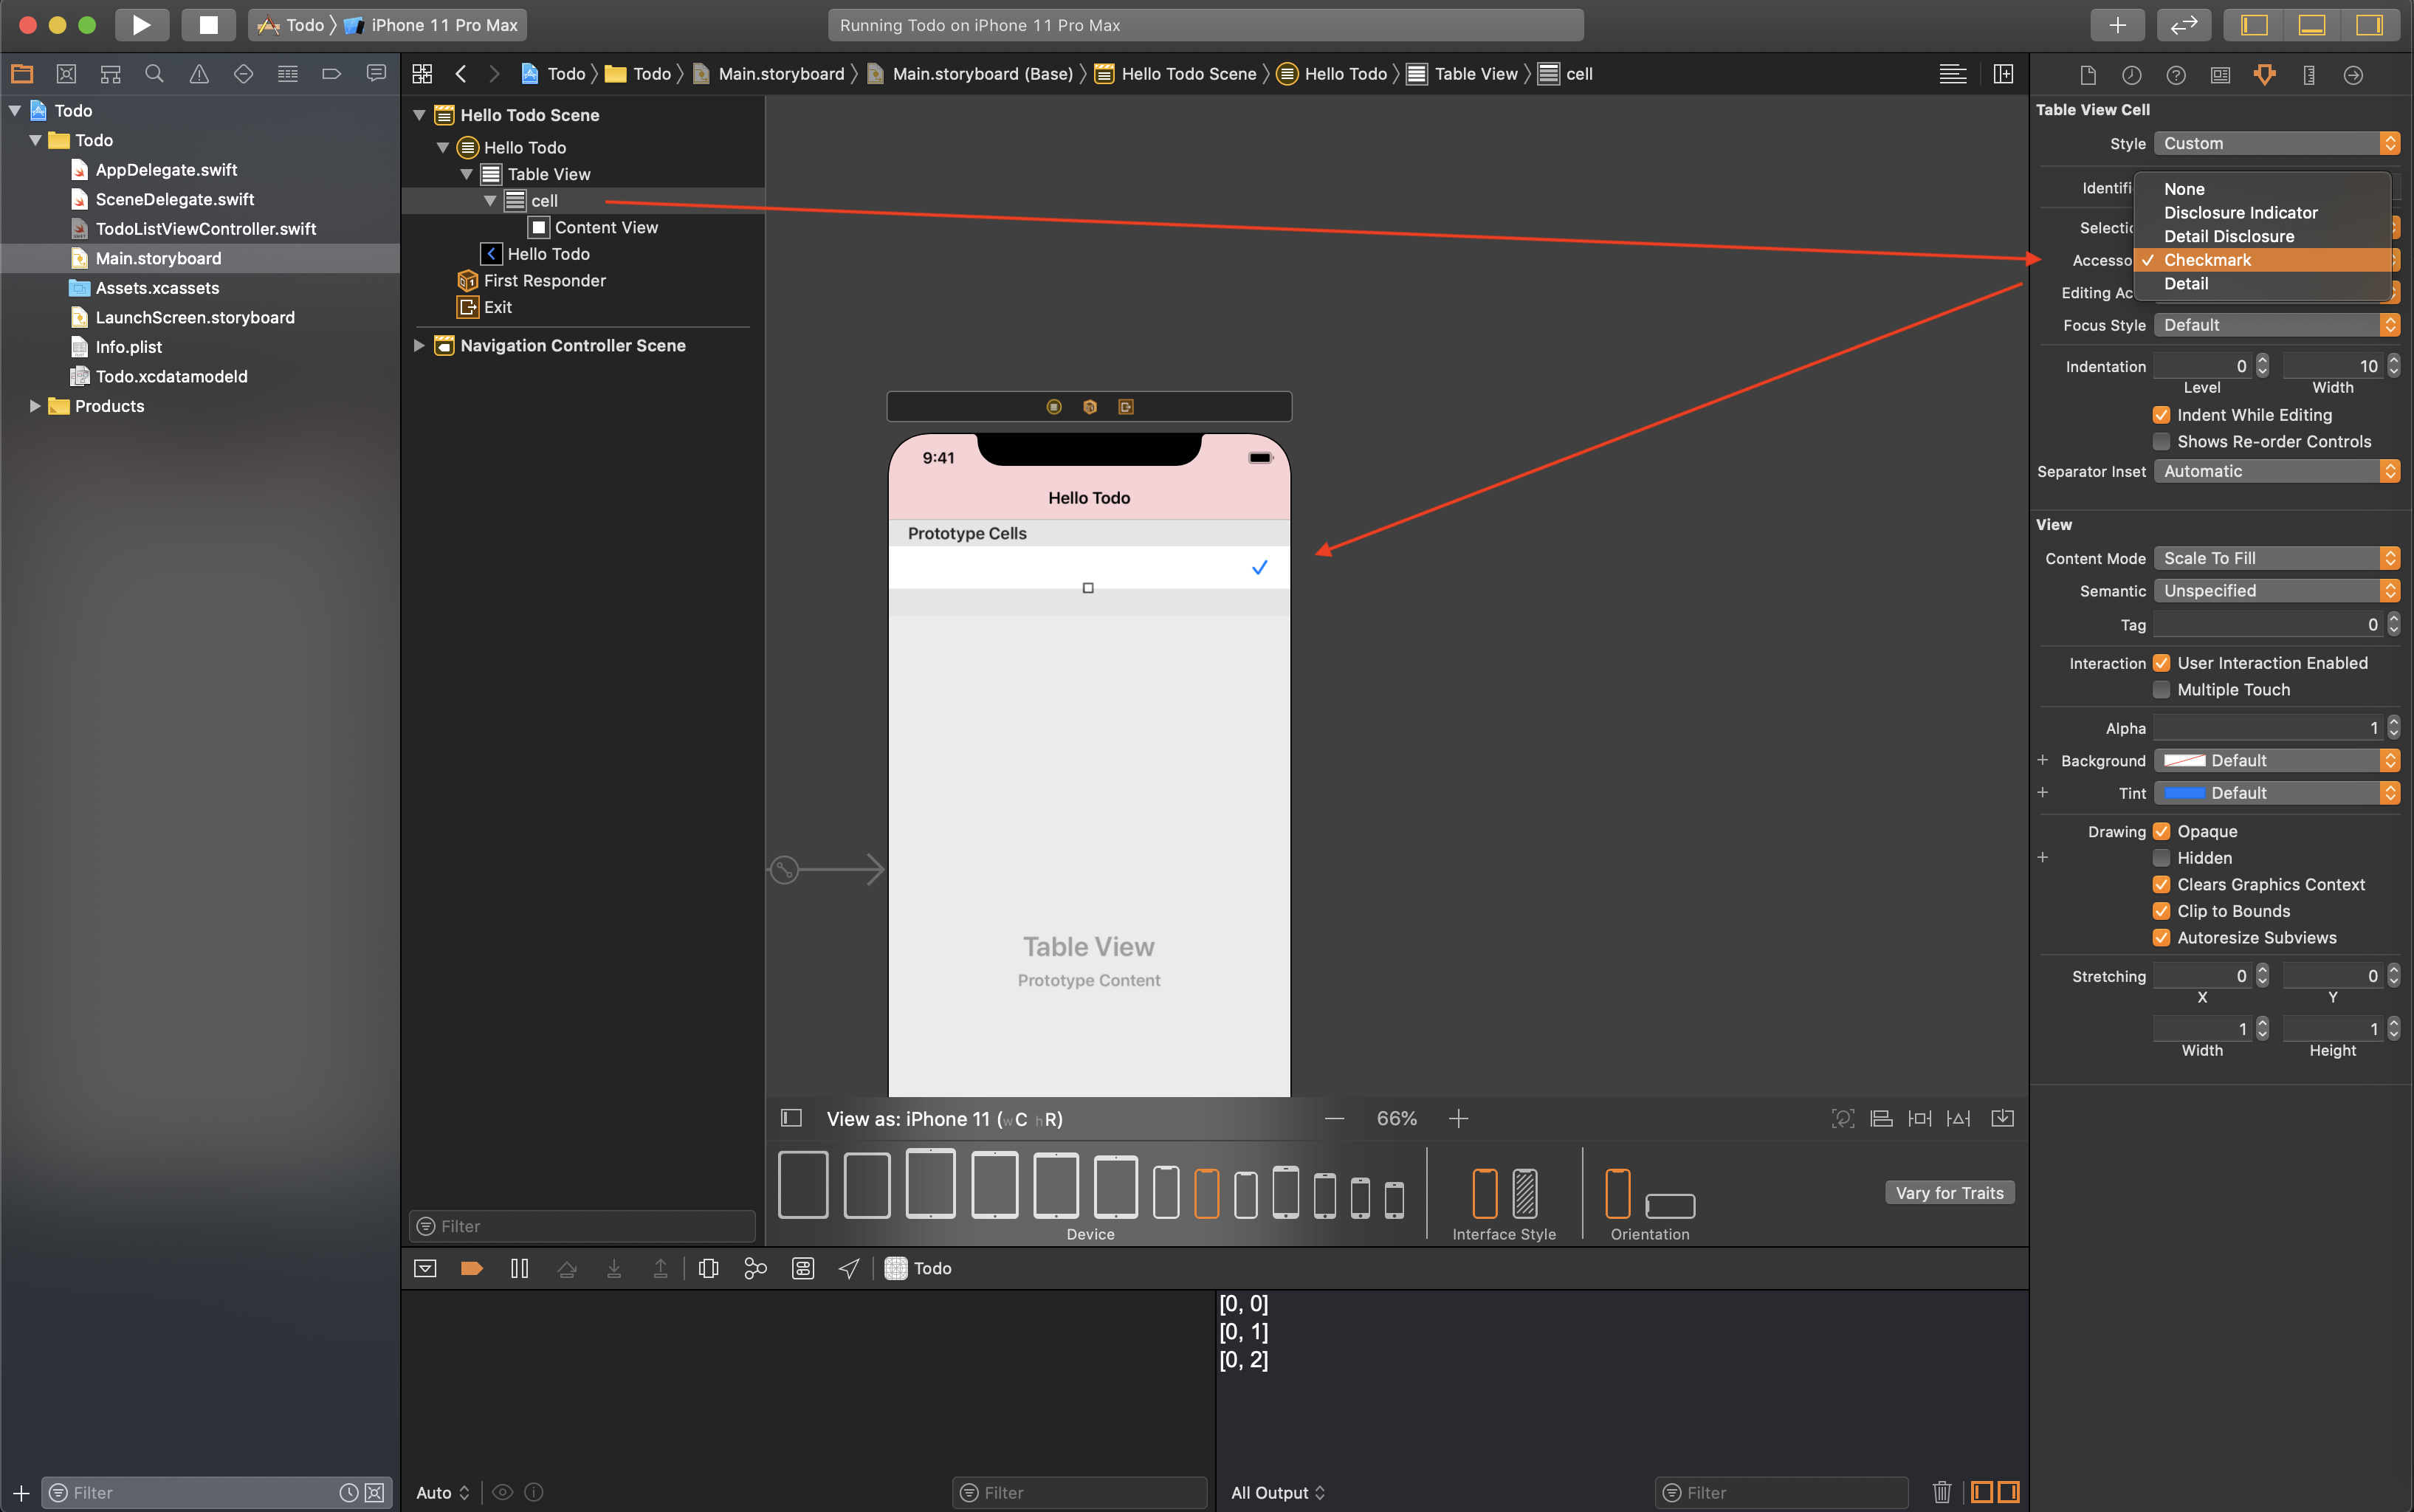
Main.storyboard에서 cell을 선택하면 inspector 패널의 Accessory에서 확인하실 수 있습니다.
아 지금 저걸 설정하라는 것은 아니고 저걸 쓰겠다는 겁니다ㅎ 뭔지 미리 보려는 거ㅎㅎ
그럼 바로 갑니다!
우리가 셀을 클릭했을 때 체크마크가 표시되기 위해서는 Table View Delegate 메서드를 이용해야 해요.
Delegate는 '위임하다'라는 의미를 갖고 있는 단어인데, 말 그대로 다른 애(프로토콜)가 일을 대신하는 겁니다.
무슨 말인지 조금 어려울 수 있는데, 저도 찾아보다가 좋은 글을 발견했어요! 한 번 읽어보시면 느낌 오실 겁니다!
iOS ) 왕초보를 위한 delegate정리
swift 공부를 하면서 꼭 알아야하는 개념 중 하나가 delegate개념인데요, 저같은 경우에는 자료들도 다 영어고 한글로 된 설명을 봐도 너무 이해하기가 어렵더라구요 :( 요 며칠간 공부를 하다가 어�
zeddios.tistory.com
우리는 UITableViewController를 채택해서 UITableViewDelegate 프로토콜을 채택하지 않아도 해당 프로토콜 관련 메서드를 사용할 수 있답니다.
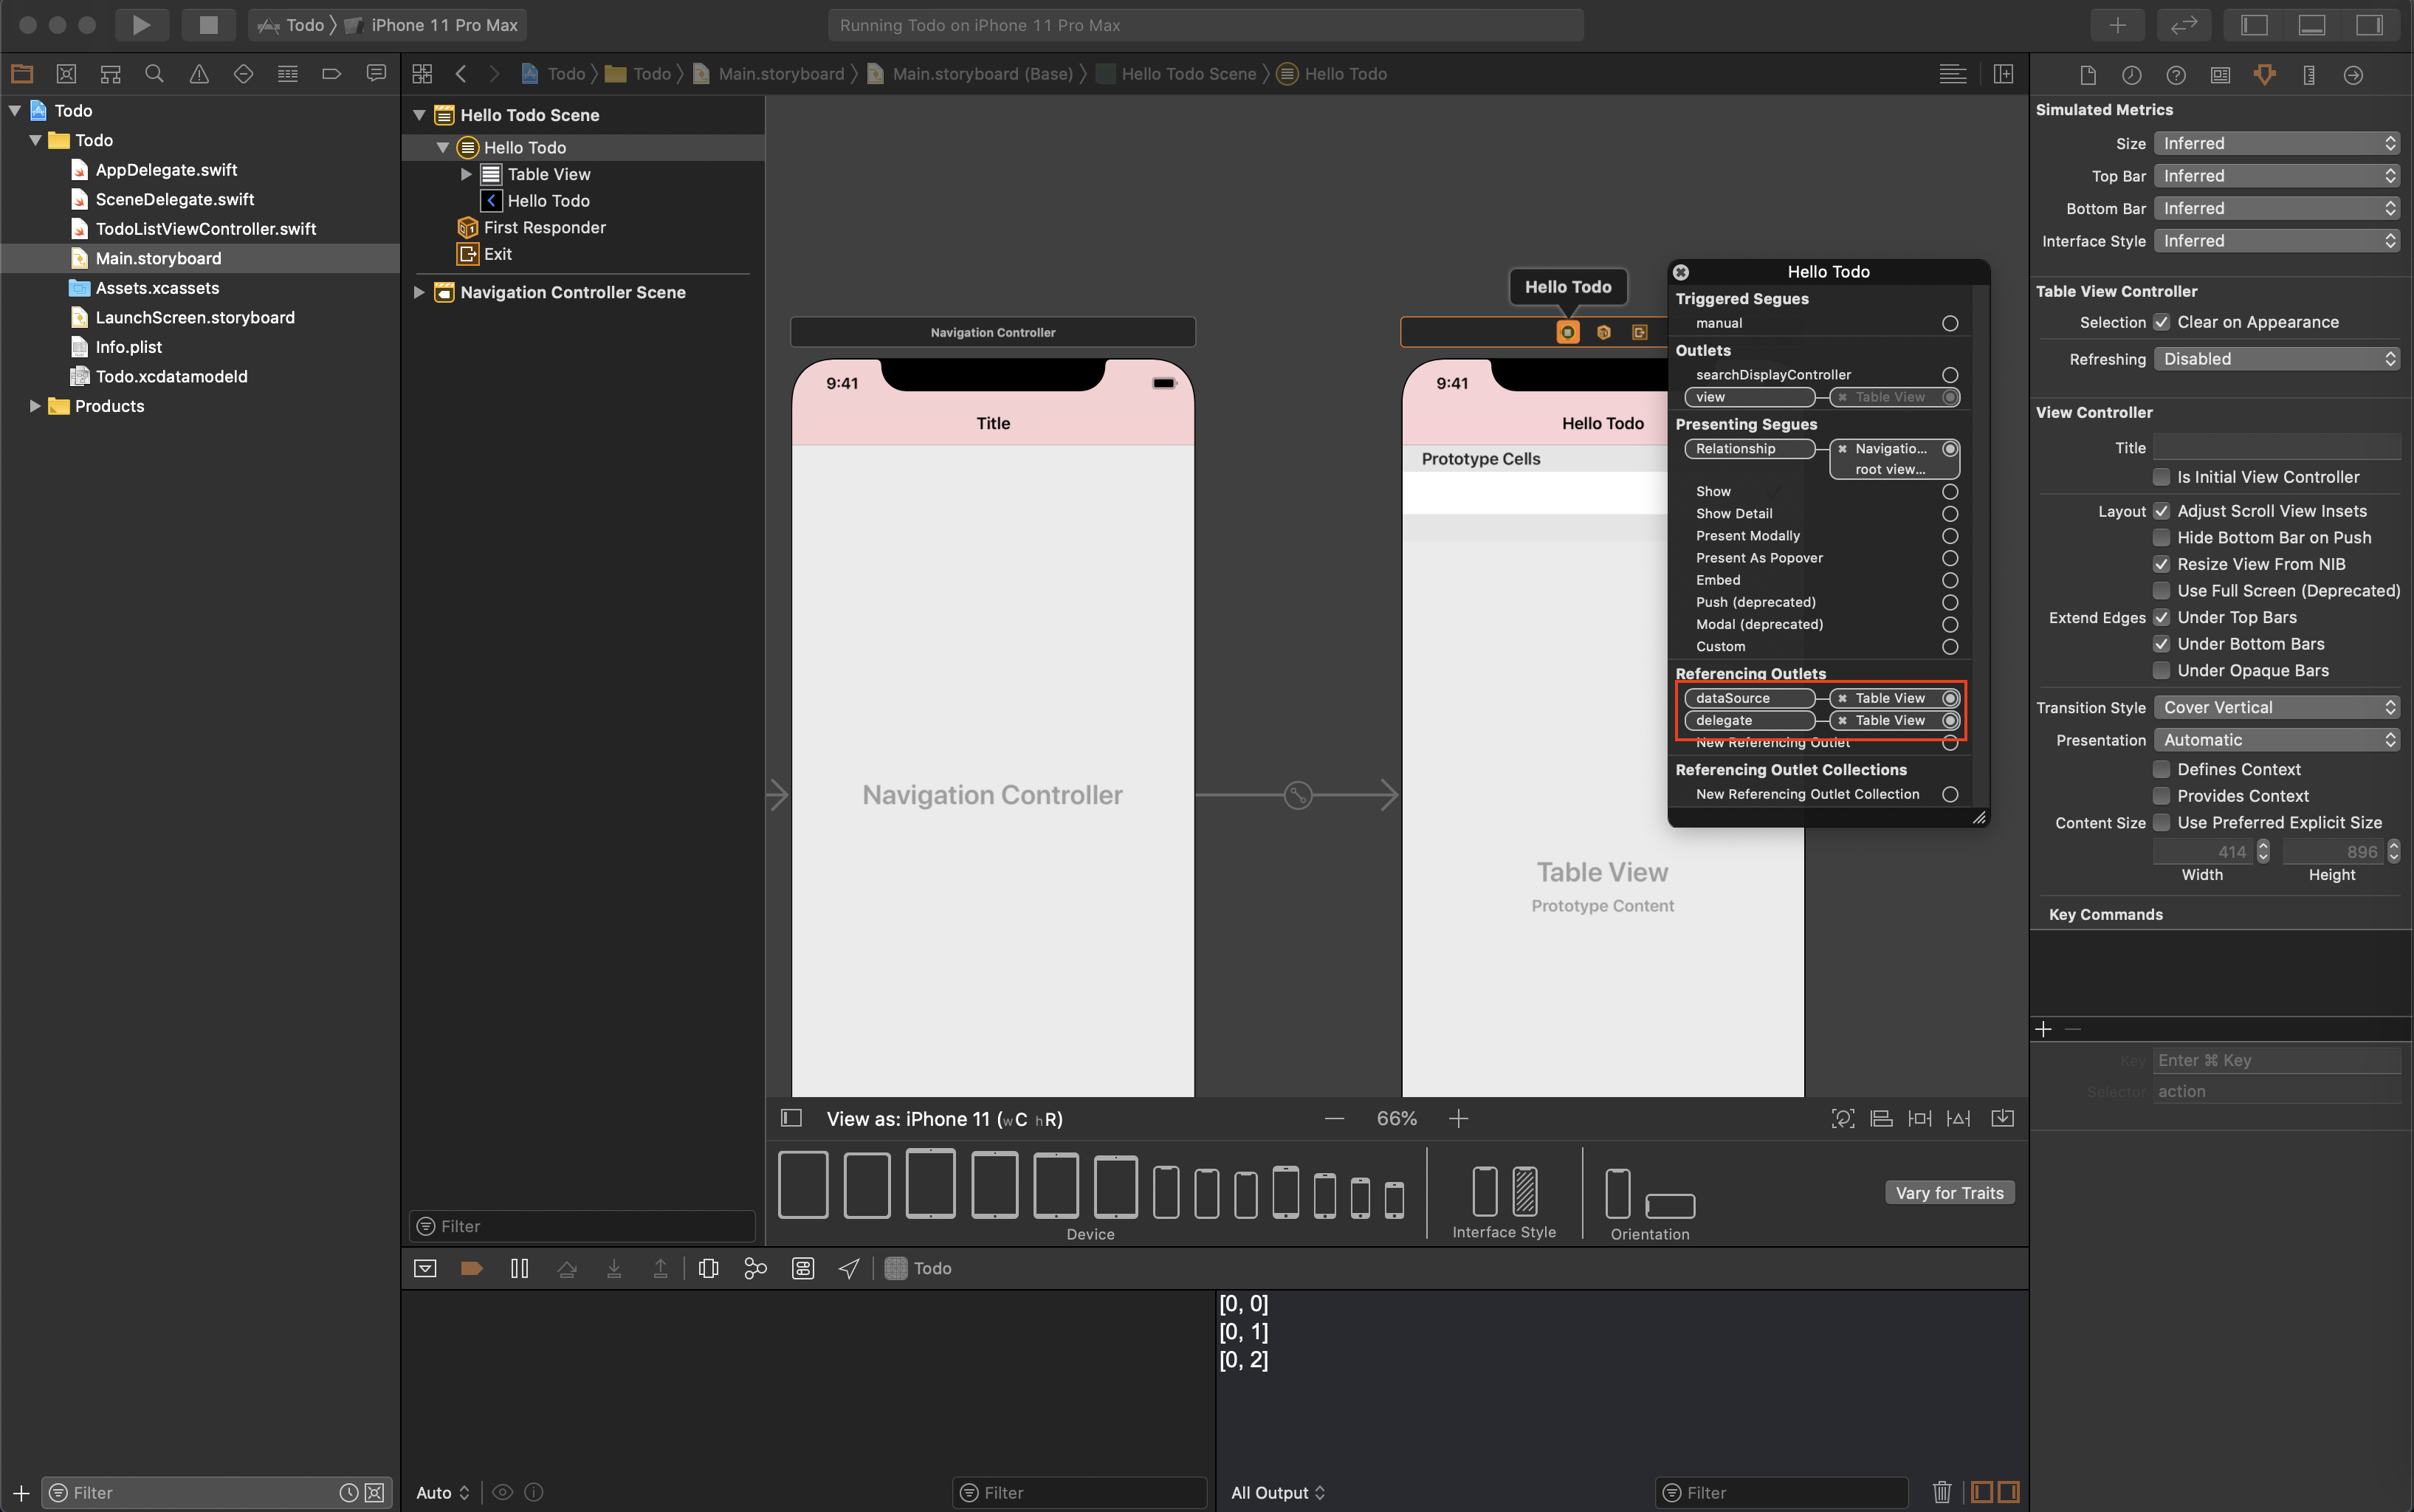
사진 속의 주황 네모 부분을 컨트롤을 누르고 클릭하면 빨간 네모 박스에서 확인할 수 있어요. 해당 프로토콜은 UITableViewDataSource랑 UITableViewDelegate입니다.
즉, 얘네들은 채택해야 사용할 수 있는 메서드를 UITableViewController 하나만 채택해도 쓸 수 있다는 거죠!
아니 체크 박스 하나 시작도 안 했는데, 또 길을 샜네요.. 원래 개발이란 그런 거죠~ 이해 부탁드려요❤️
그럼 다시 돌아가서,
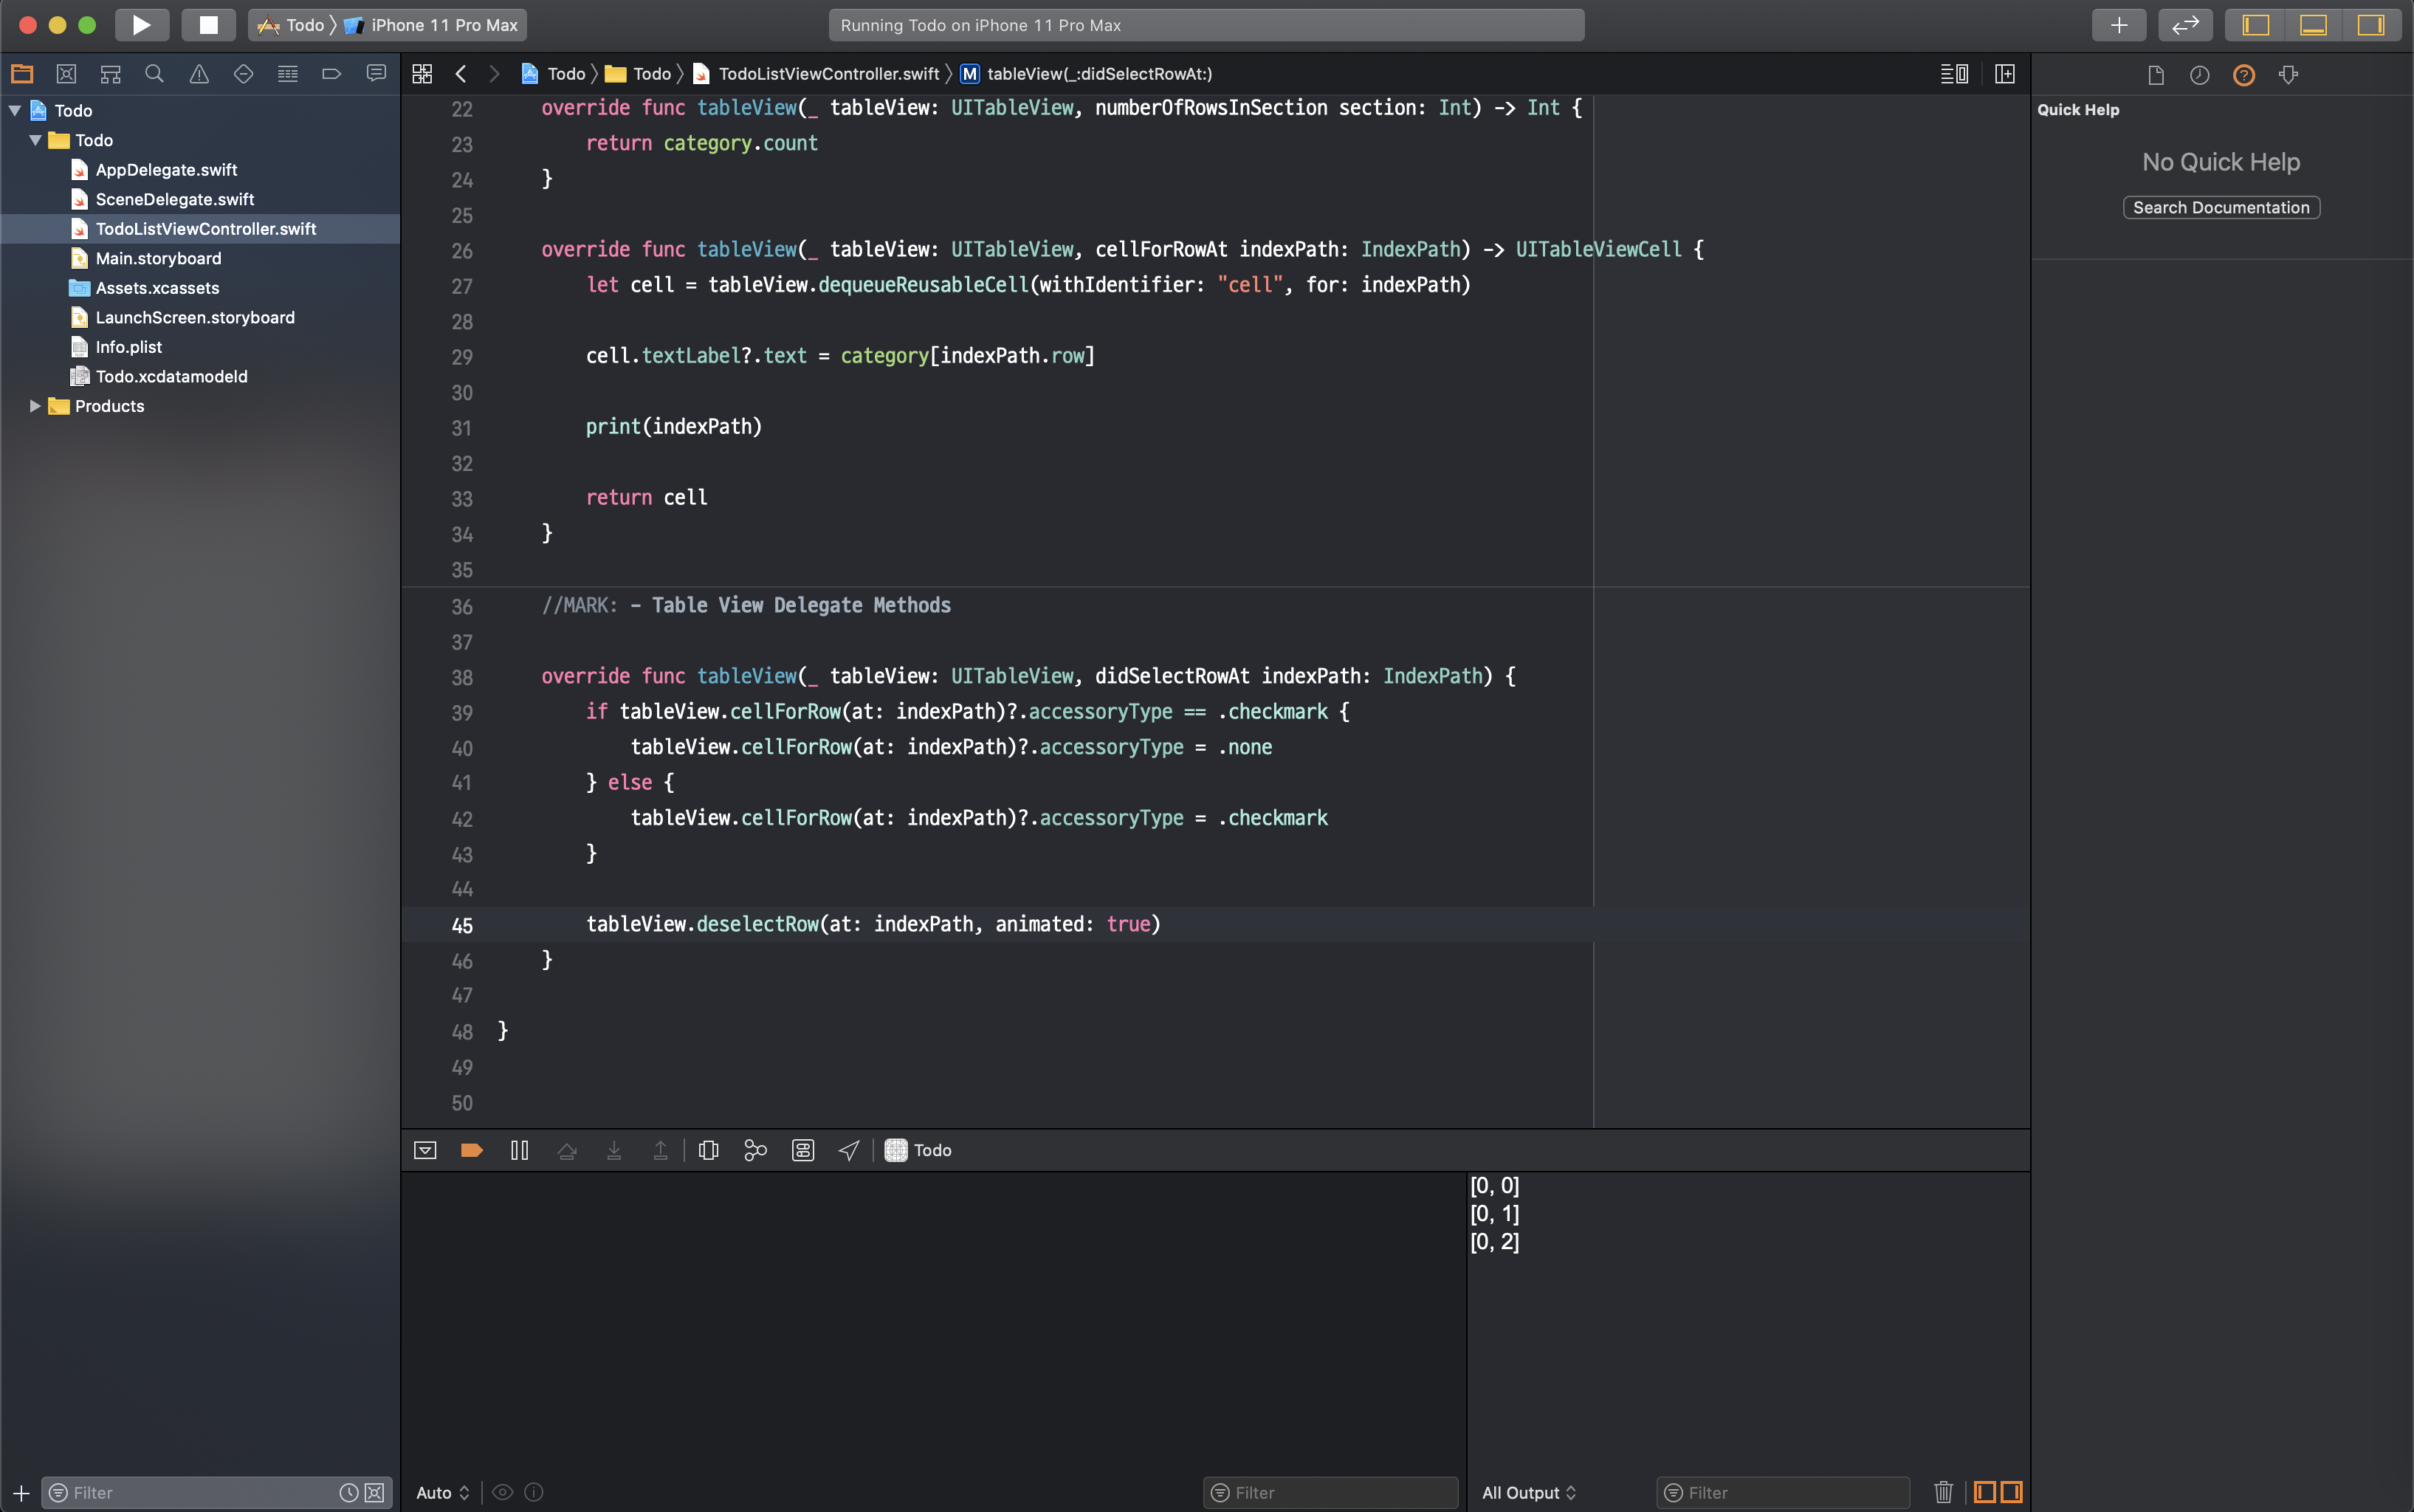
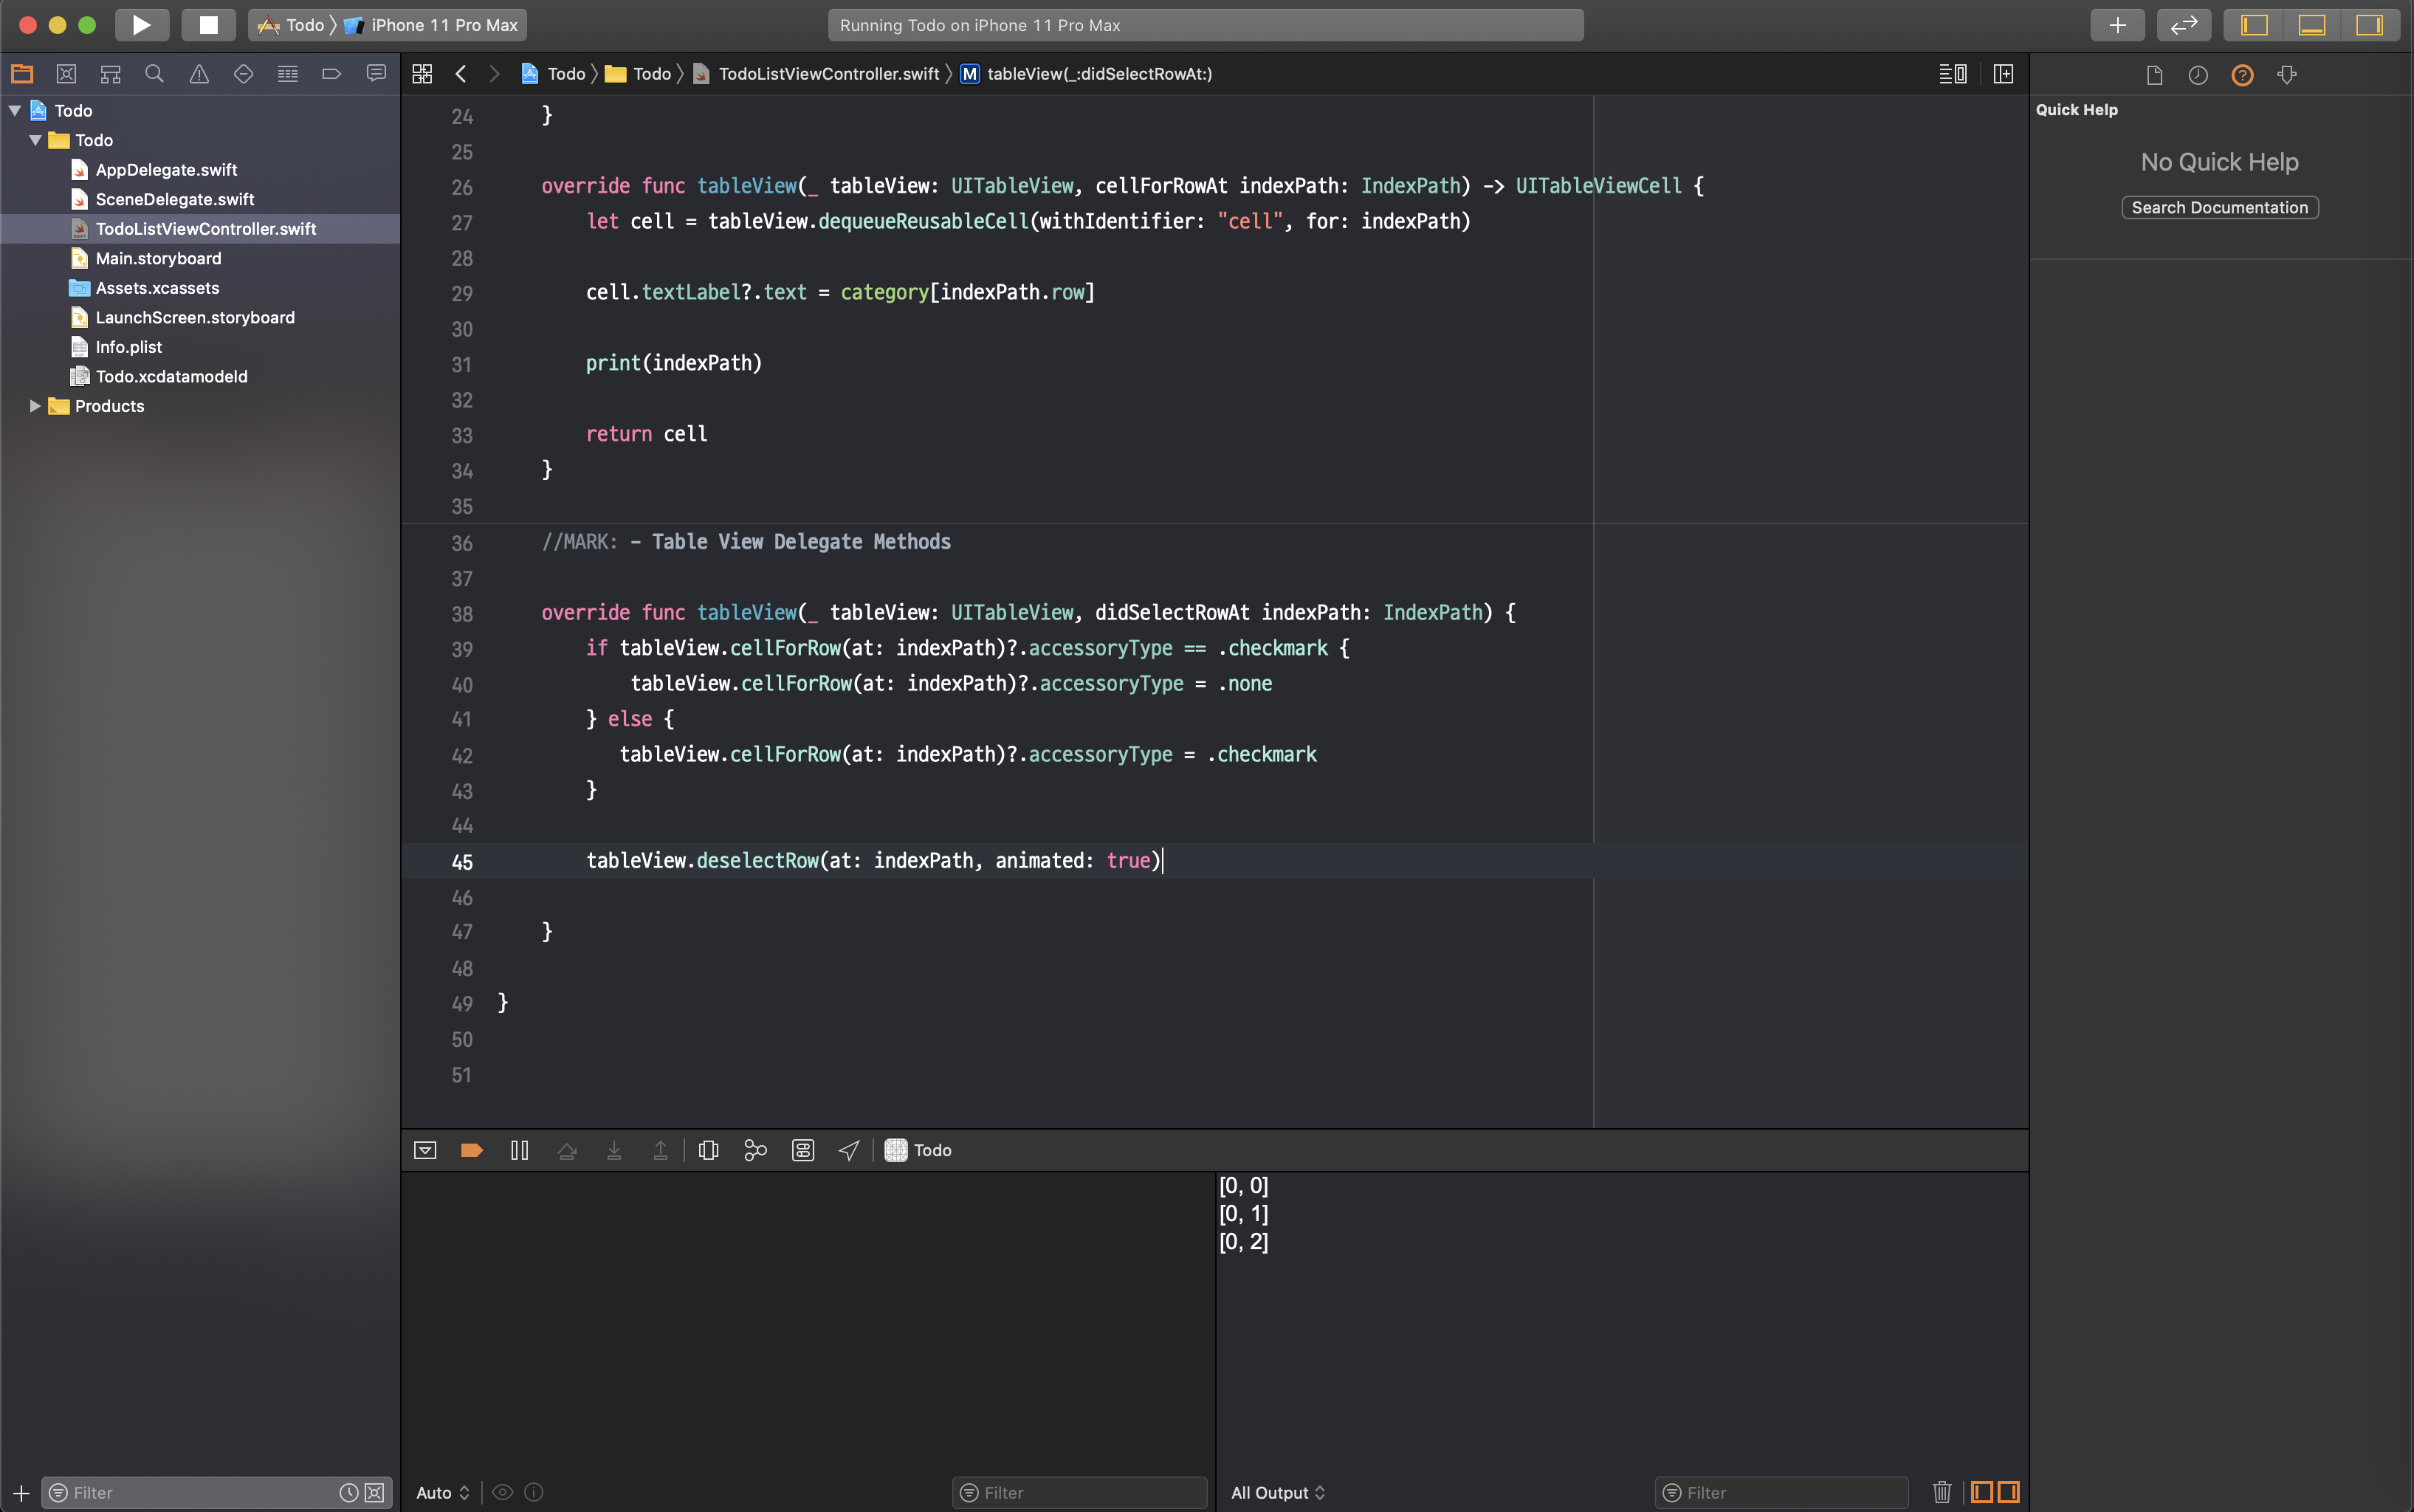
didSelectRowAt 메서드를 사용해줍니다. 이건 우리가 특정 열(row)을 클릭하면, 델리게이트한테 "야 열 선택됐다"라고 말해주는 거예요. 이 메서드 안에 사진처럼 선택된 열이 체크마크 있으면 없애고, 없으면 만들게 해 주면 돼요.
Line 45의 deselectRow는 우리가 열 선택했을 때 회색 배경이 남아있잖아요. 그거 없애주는 역할을 합니다.
다음은 내비게이션 바에 버튼을 하나 추가해줄 겁니다. 이 버튼의 목적은 누르면 텍스트를 입력할 수 있는 alert가 뜨고, 텍스트를 입력하면 category 리스트에 추가되도록 할 거예요!
Main.storyboard로 이동해서 command + shift + L을 눌러 Bar Button Item을 사진과 같이 추가해주세요!
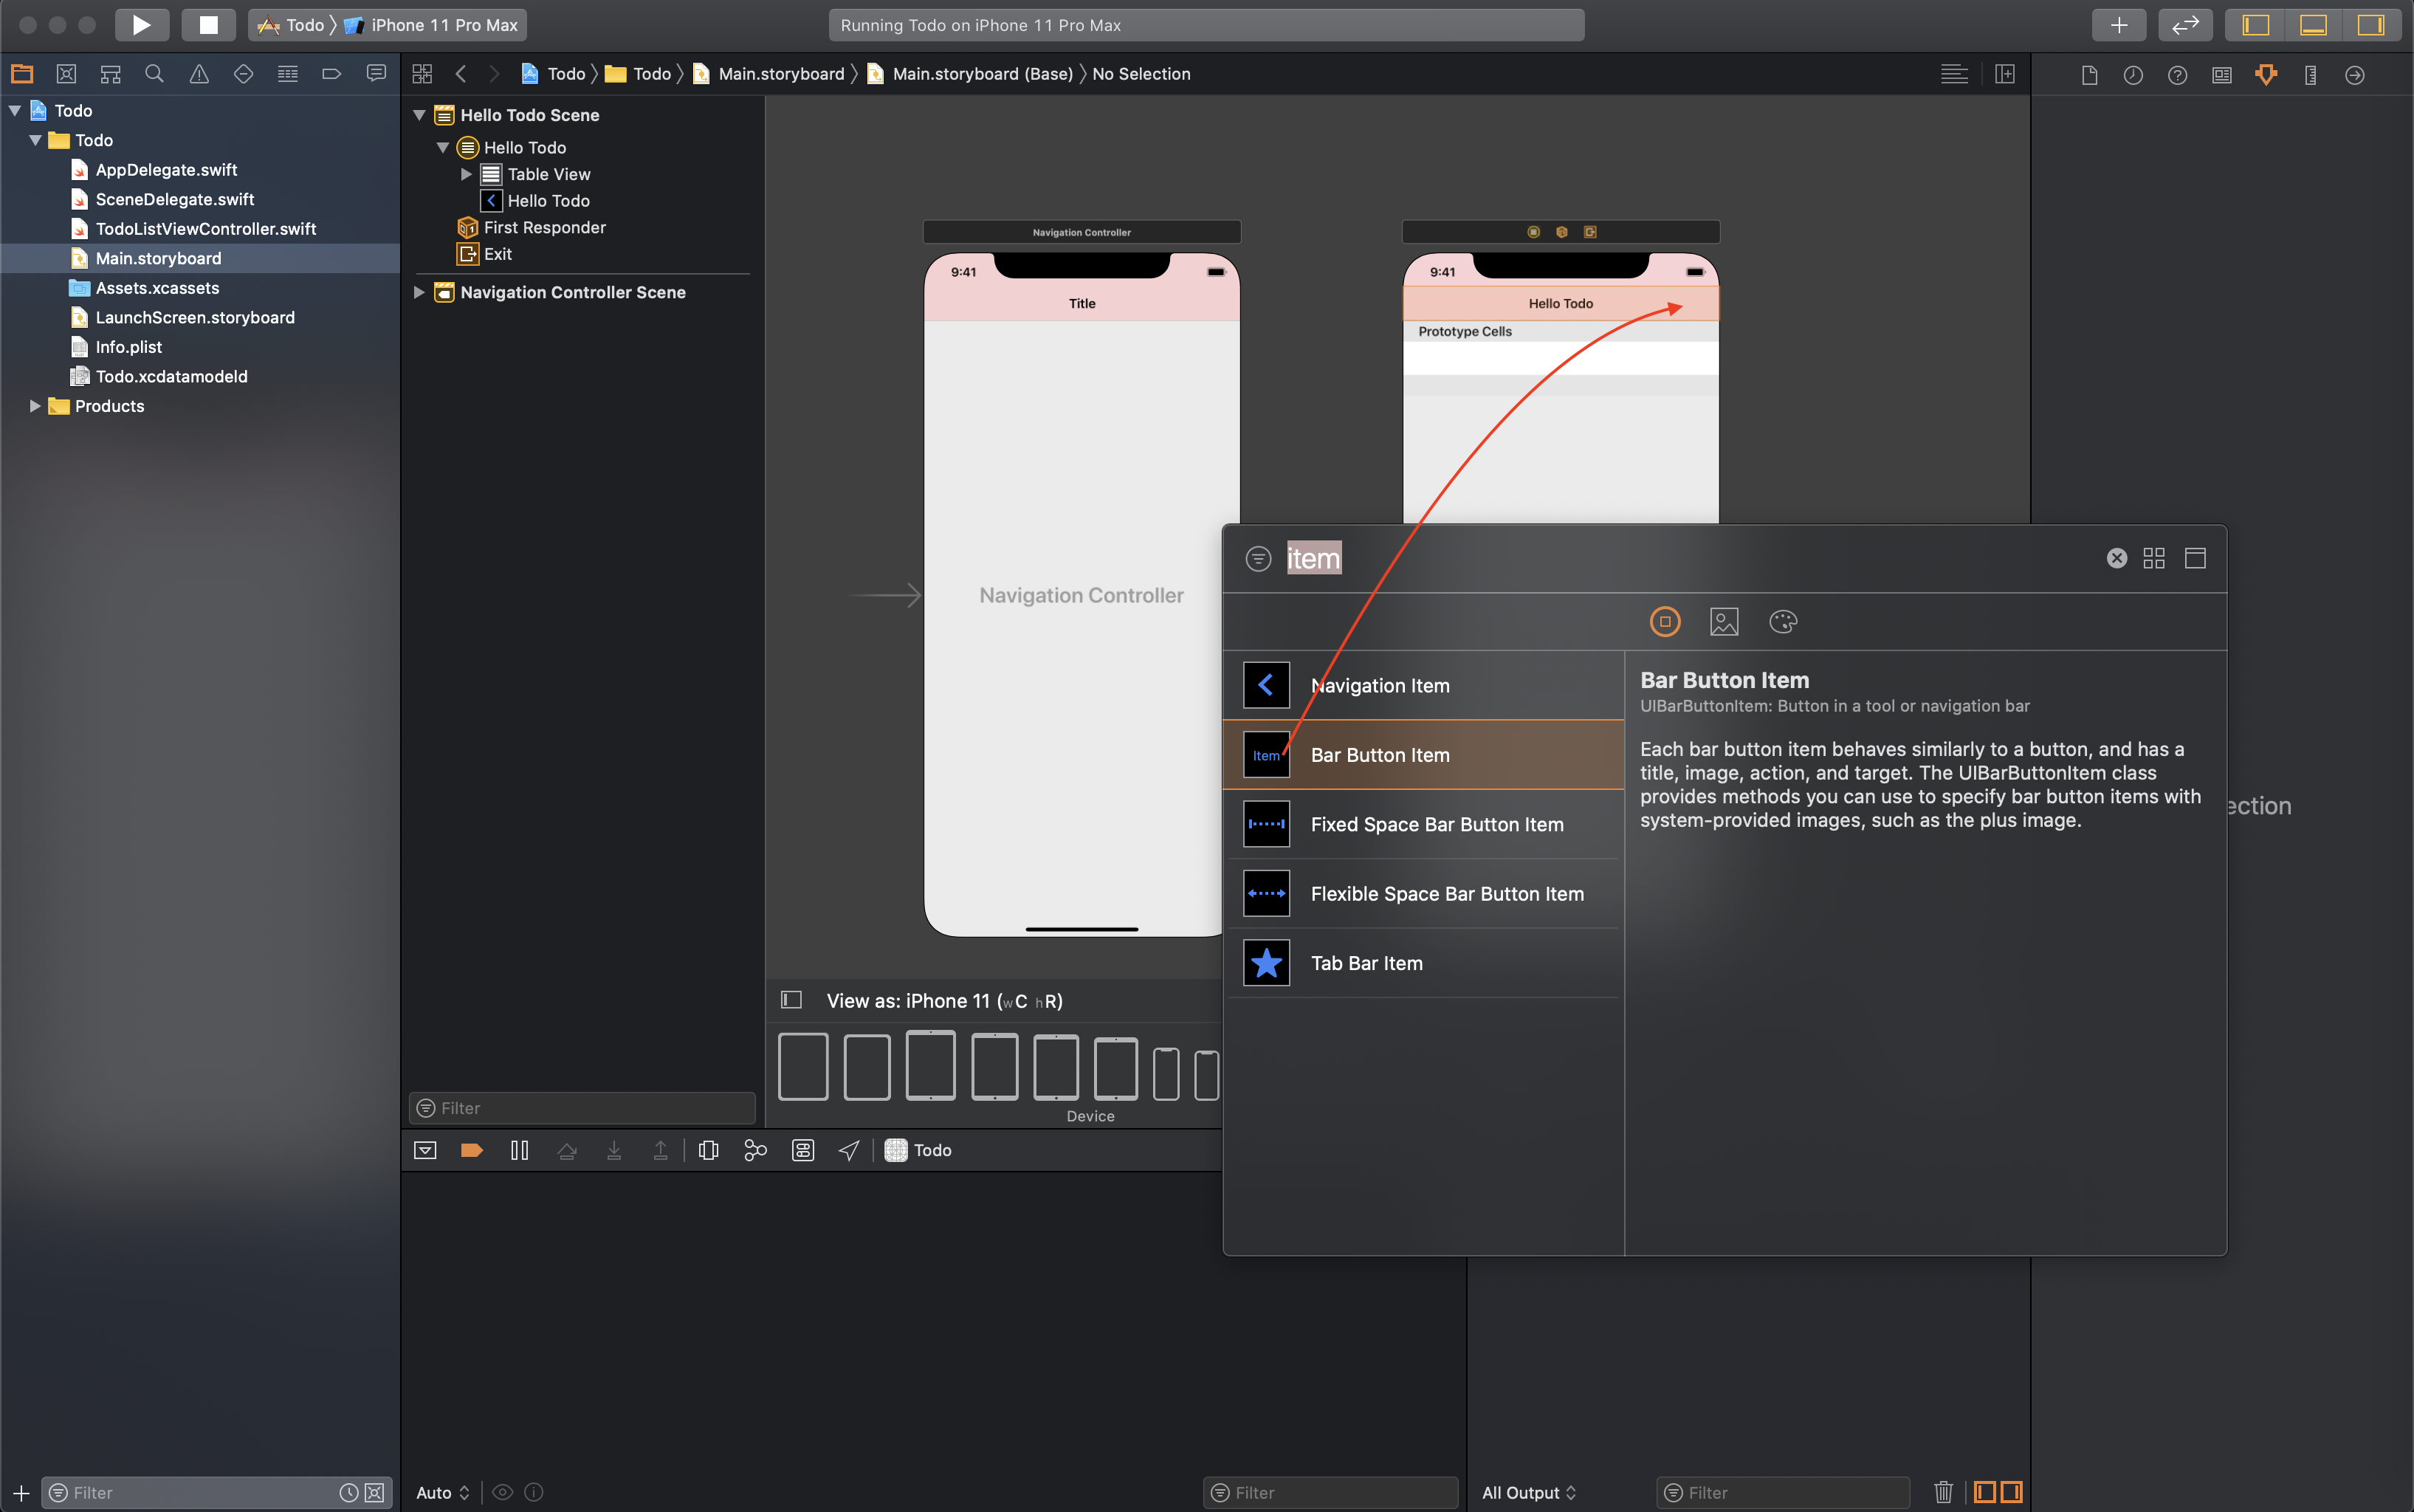
추가하고, 오른쪽의 Attributes inspector 패널에서 System Item을 Add로 바꿔주시면 +로 바뀝니다 (저는 디자인이 아주 중요한 사람이라 색도 바꿨어요! 색은 System Item 밑에 Tint 속성!!)
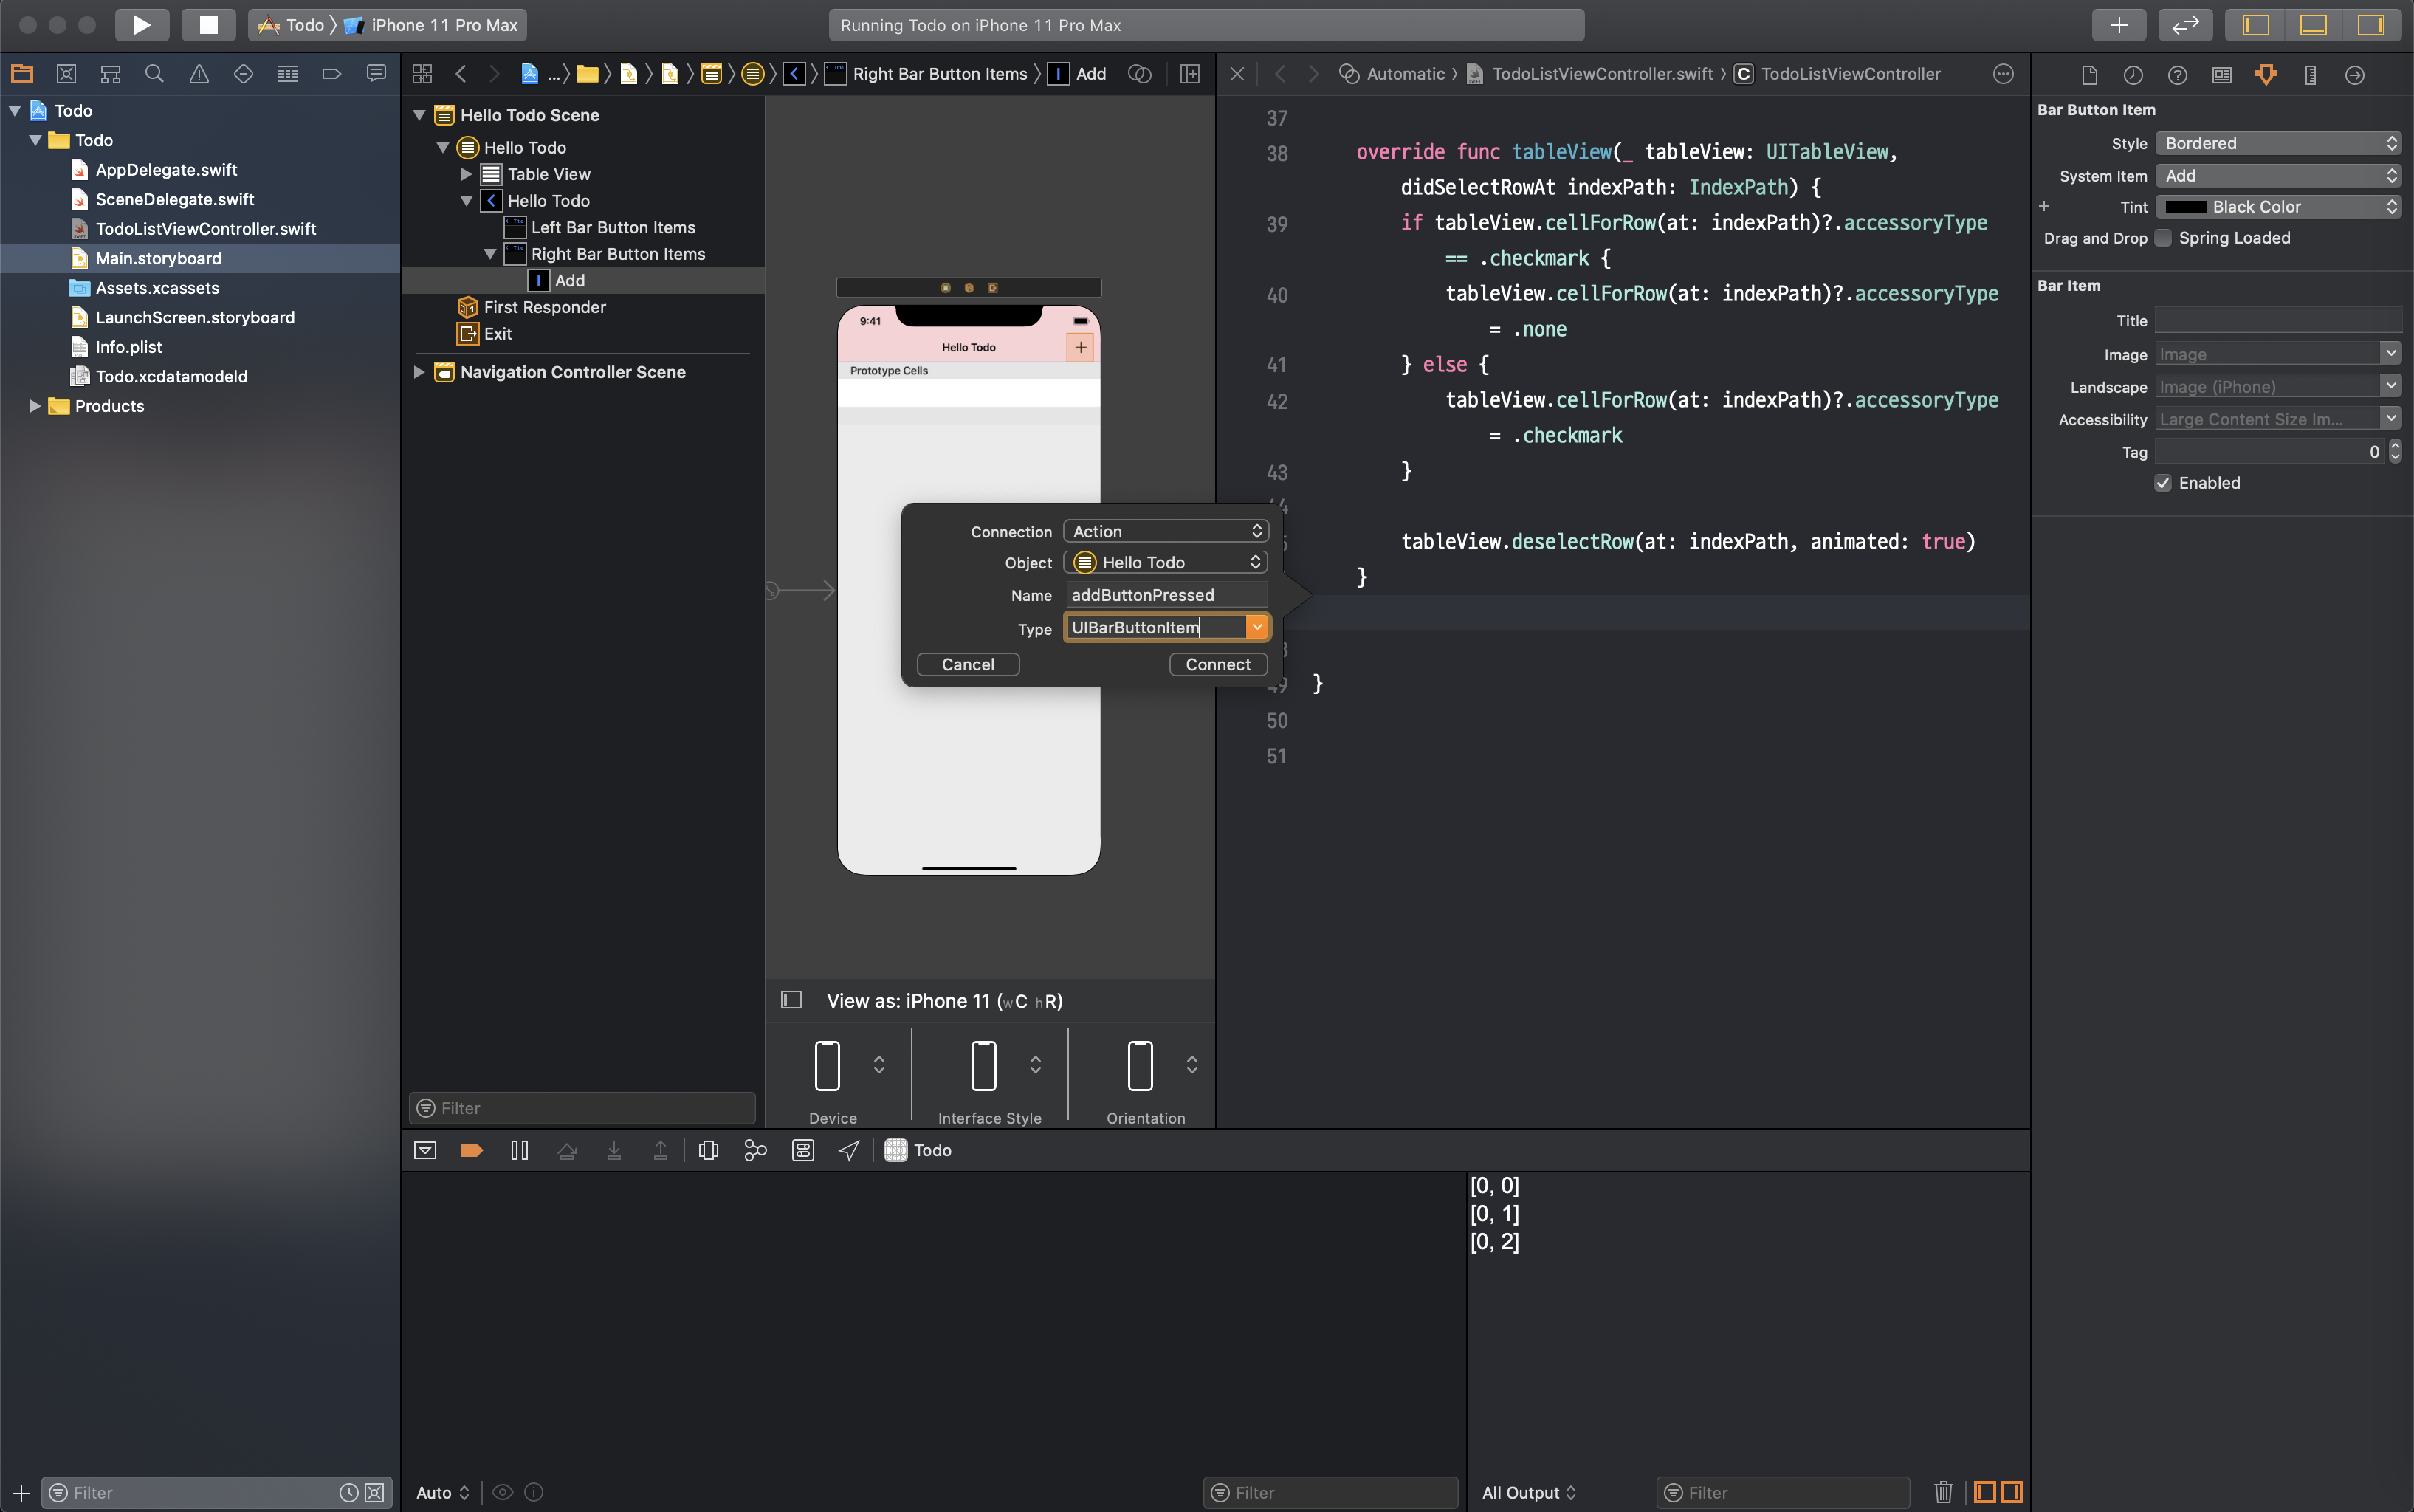
이제 만들었으니깐 코드로 이어줘야겠죠? Main.story에서 control + option + command + return을 살포시 눌러주시면 옆에 우리의 코드들이 모여있는 TodoListViewController.swift가 뜹니다! (혹시 이상한 코드들이 뜨면 그 창 닫기 오른쪽에 있는 곳 클릭해서 찾으시면 돼요.)
Add 버튼을 먼저 한 번 클릭하고 control 버튼을 누른 채로 다시 클릭해 쭉 끌어 밑에 놔주세요! 이름은 맘대로 해주시고, Type은 Any 말고 UIBarButtonItem으로 해주세요!
먼저 코드부터 보고 가실게요~
//TodoListViewController.swift

import UIKit

class TodoListViewController: UITableViewController {

    let category = ["Home", "Library", "Coin"]

    override func viewDidLoad() {
        super.viewDidLoad()
        // Do any additional setup after loading the view.
    }

    //MARK: - TableView Datasource Methods

    override func tableView(_ tableView: UITableView, numberOfRowsInSection section: Int) -> Int {
        return category.count
    }

    override func tableView(_ tableView: UITableView, cellForRowAt indexPath: IndexPath) -> UITableViewCell {
        let cell = tableView.dequeueReusableCell(withIdentifier: "cell", for: indexPath)

        cell.textLabel?.text = category[indexPath.row]

        print(indexPath)

        return cell
    }

    //MARK: - Table View Delegate Methods

    override func tableView(_ tableView: UITableView, didSelectRowAt indexPath: IndexPath) {
        if tableView.cellForRow(at: indexPath)?.accessoryType == .checkmark {
            tableView.cellForRow(at: indexPath)?.accessoryType = .none
        } else {
            tableView.cellForRow(at: indexPath)?.accessoryType = .checkmark
        }

        tableView.deselectRow(at: indexPath, animated: true)
    }

    // 추가한 부분
    @IBAction func addButtonPressed(_ sender: UIBarButtonItem) {
        let alert = UIAlertController(title: "New Category", message: "Enter a name for this category.", preferredStyle: .alert)

        let addAction = UIAlertAction(title: "Add", style: .default) { (action) in
            print("add")
        }

        let cancelAction = UIAlertAction(title: "Cancel", style: .cancel) { (action) in
            print("cancel")
        }

        //아래 두 줄 순서는 어떻게 하든지 결과는 같아요!
        alert.addAction(addAction)
        alert.addAction(cancelAction)

        present(alert, animated: true, completion: nil)

    }

}
그리고 시뮬레이터로 Add 버튼을 클릭하고 확인해보면 이렇게 나옵니다!
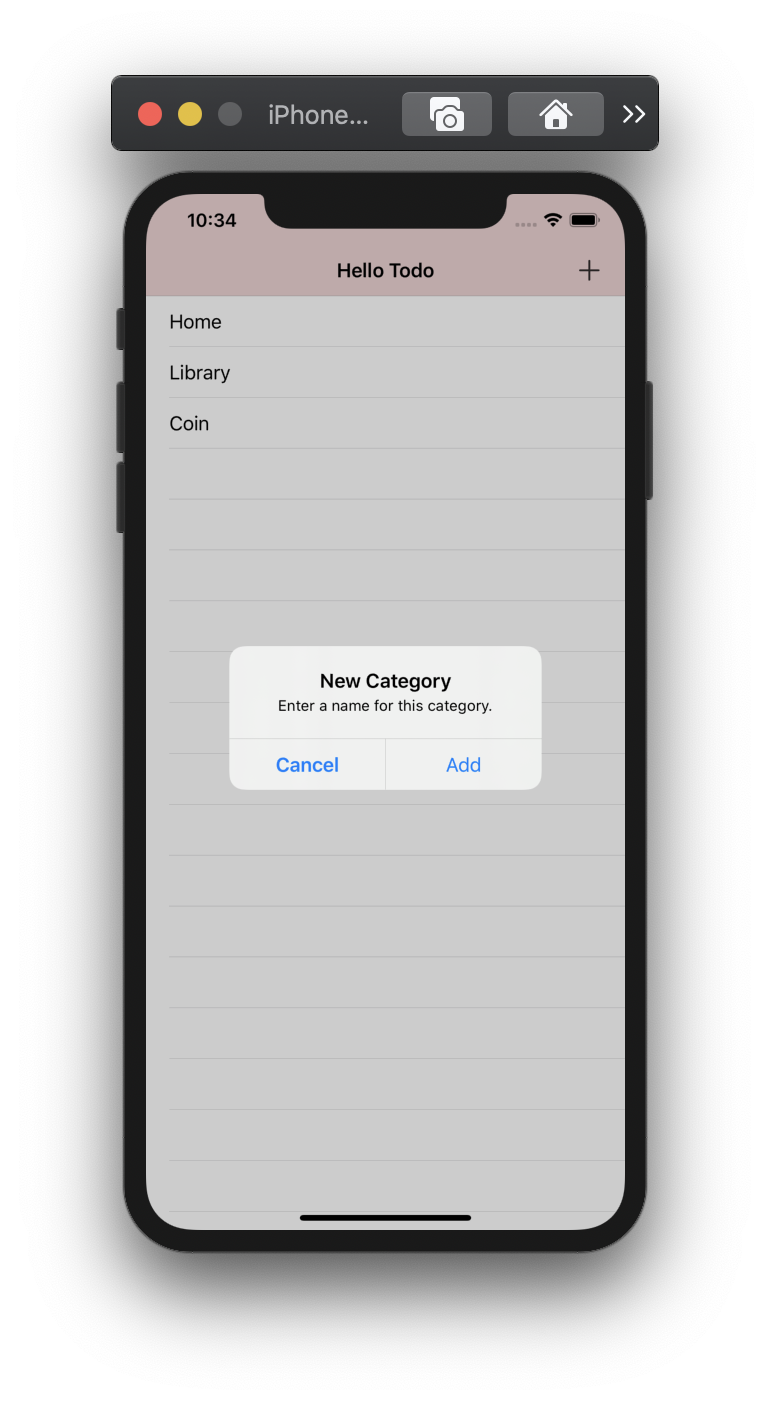
전체적인 구조를 보면 alert에 action을 붙이고 present를 통해 화면에 나타내 줍니다!
참고로 Cancel버튼과 같이 버튼을 클릭한 후 다른 이벤트를 필요로 하지 않으면,
let cancelAction = UIAlertAction(title: "Cancel", style: .cancel, handler: nil)
이렇게도 사용할 수 있습니다! 여기서 handler는 가장 아래 코드의 completion과 같은 역할을 해요!
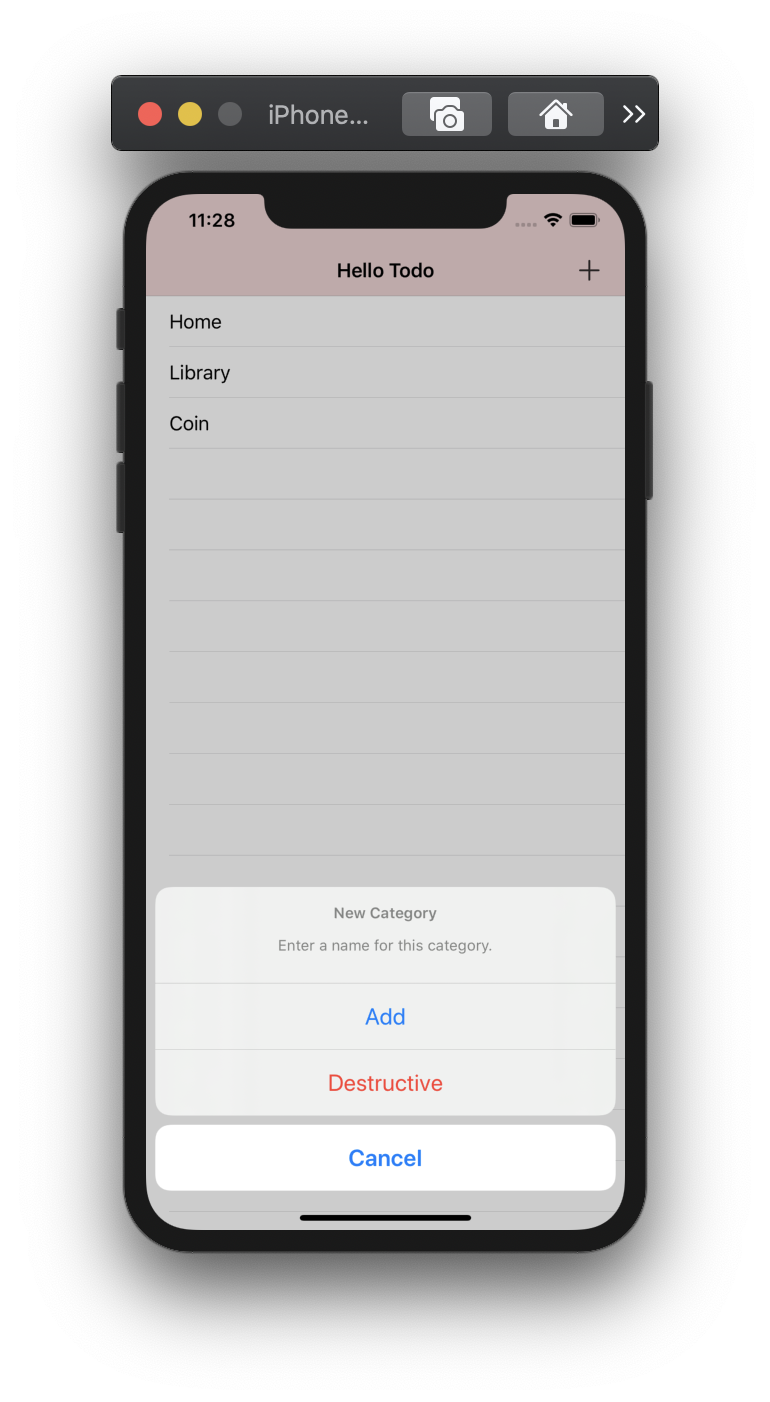
여기서 재밌는 점은 alert에 addAction을 먼저 붙였는데도 cancel 버튼이 왼쪽에 있다는 점이었어요. action의 style 중에 .destructive도 있는데 세 개를 붙이니깐 .cancel의 스타일을 지닌 버튼이 가장 아래로 가더라고요!
참고로 HIG에서 3개 이상의 action이 붙으면 alert의 preferredstyle로 actionSheet를 사용하라고 권고(강제)하고 있어요!
번역도 같이 있는데 한 번 읽어보세요! (넵 제가 했습니닿ㅎ 똥 번역이라도 이해 해주세욯ㅎ)
https://wnsah052.tistory.com/30
HIG) Views - Alerts 번역
Alerts Alerts convey important information related to the state of your app or the device, and often request feedback. An alert consists of a title, an optional message, one or more buttons, and opt..
wnsah052.tistory.com
ActionSheet는 이렇게 생겼어요!
다음 포스트에서는 alert 안에 텍스트를 적는 부분부터 해볼게요 감사합니다!
전체 코드
//TodoListViewController.swift

import UIKit

class TodoListViewController: UITableViewController {

    let category = ["Home", "Library", "Coin"]

    override func viewDidLoad() {
        super.viewDidLoad()
        // Do any additional setup after loading the view.
    }

    //MARK: - TableView Datasource Methods

    override func tableView(_ tableView: UITableView, numberOfRowsInSection section: Int) -> Int {
        return category.count
    }

    override func tableView(_ tableView: UITableView, cellForRowAt indexPath: IndexPath) -> UITableViewCell {
        let cell = tableView.dequeueReusableCell(withIdentifier: "cell", for: indexPath)

        cell.textLabel?.text = category[indexPath.row]

        print(indexPath)

        return cell
    }

    //MARK: - Table View Delegate Methods

    override func tableView(_ tableView: UITableView, didSelectRowAt indexPath: IndexPath) {
        if tableView.cellForRow(at: indexPath)?.accessoryType == .checkmark {
            tableView.cellForRow(at: indexPath)?.accessoryType = .none
        } else {
            tableView.cellForRow(at: indexPath)?.accessoryType = .checkmark
        }

        tableView.deselectRow(at: indexPath, animated: true)
    }

    @IBAction func addButtonPressed(_ sender: UIBarButtonItem) {
        let alert = UIAlertController(title: "New Category", message: "Enter a name for this category.", preferredStyle: .alert)

        let addAction = UIAlertAction(title: "Add", style: .default) { (action) in
            print("add")
        }

        let cancelAction = UIAlertAction(title: "Cancel", style: .cancel) { (action) in
            print("cancel")
        }

        alert.addAction(cancelAction)
        alert.addAction(addAction)

        present(alert, animated: true, completion: nil)
    }

}
수정해야 할 부분이 있으면 알려주세요!
감사합니다!
'Dot > iOS' 카테고리의 다른 글
| iOS) tableView(_:cellForRowAt:) / tableView(_:numberOfRowsInSection:) (0) | 2020.10.11 |
|---|---|
| iOS) CoreML을 이용한 트위터 감정 분석 앱 만들기 (0) | 2020.09.23 |
| iOS) Realm을 이용한 Swift Todo 앱 만들기 (1) (0) | 2020.05.07 |
| iOS) 간단한 타이머 만들기 (0) | 2020.01.05 |
| Xcode) 한 줄 삭제 단축키 (8) | 2019.12.27 |


댓글